Homelab Server Rack Build
One rack to rule them all. A 25U server rack housing the Dell R620, switches, PDUs, and all the networking gear needed for a serious homelab.
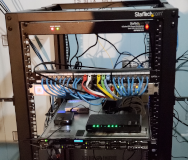
Table of Contents
- The Problem
- What We’re Building
- The Hardware
- Rack Components
- Server Specs: Dell R620
- The Build Process
- Step 1: Rack Assembly
- Step 2: Planning the Layout
- Step 3: Cable Management
- Step 4: Power Distribution
- Step 5: Network Topology
- Performance
- Network Performance
- Power Consumption
- What Runs Here
- Lessons Learned
- Future Upgrades
- Conclusion
The Problem
The hobby had grown. What started as one server under a desk had become three machines, two switches, a UPS, countless cables, and a growing collection of “temporary” solutions that were becoming permanent.
The desk was gone. The floor was covered. Cable management was a distant dream.
I needed containment. I needed structure. I needed a rack.
What We’re Building
A proper homelab rack housing:
- Dell R620 1U server — The heavy lifter
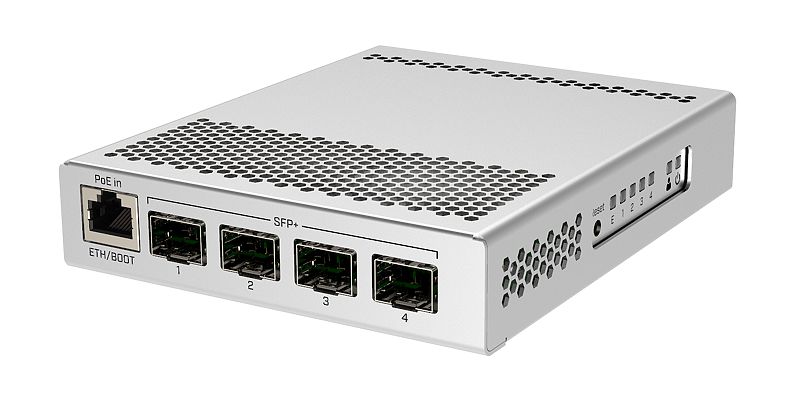
- Mikrotik CRS305 — 10G switching
- Ubiquiti US-24 — PoE for access points
- Cat6 patch panel — Finally, cable management
- PDU — Power distribution
- UPS — Battery backup for the essentials
- Fiber ONT — ISP connection
The Hardware
Rack Components
| Component | Model | Price (Approx) |
|---|---|---|
| Rack | StarTech 25U | $300 |
| PDU | StarTech 15A | $80 |
| Patch Panel | Cat6 24-port | $40 |
| Cable Manager | 1U horizontal | $20 |
| Rack Rails | Dell compatible | $50 |
| UPS | CyberPower 1500VA | $180 |
| Server | Dell R620 (used) | $300 |
Total: ~$970
Server Specs: Dell R620
| Component | Specs |
|---|---|
| CPU | Dual Xeon E5-2660 (16 cores / 32 threads) |
| RAM | 128GB DDR3 ECC |
| Storage | 8x 2.5” bays |
| NIC | Dual 10G SFP+ |
| PSU | Dual 750W (redundant) |
Yes, it’s old. No, I don’t care. Used enterprise gear is the homelab way: cheap, powerful, and built like tanks.
The Build Process
Step 1: Rack Assembly
The StarTech rack came flat-packed. Assembly was straightforward — four posts, casters, sides, top. Took about an hour with basic tools.
Pro tip: Don’t fully tighten bolts until everything’s aligned. Square frames make happy admins.
Step 2: Planning the Layout
Before mounting anything, I planned the layout:
Top:
  1U - Cable manager
  1U - Patch panel
  1U - Mikrotik CRS305
  1U - Ubiquiti US-24
  1U - Blank panel

Middle:
  1U - Dell R620
  2U - Open for future expansion

Bottom:
  2U - CyberPower UPS
  1U - Blank panel
  1U - PDU (rear-mounted)
Heavy things go low. Heat-generating things have spacing. Patch panel and switches are at eye level for easy access.
Step 3: Cable Management
This is where the magic happens. Every cable:
- Labeled at both ends
- Measured to length (no excess loop)
- Secured with velcro (not zip ties — reusable beats permanent)
The patch panel connects to wall ports throughout the house. Each port labeled: “Living Room”, “Office”, “Bedroom”, etc.
Step 4: Power Distribution
The PDU provides 8 outlets, but I’m only using:
- Dell R620 (primary)
- Dell R620 (secondary)
- Mikrotik switch
- Ubiquiti switch
- Future expansion x4
The UPS protects the critical infrastructure: switches and the server’s secondary PSU. If power fails, the server stays on long enough for a graceful shutdown.
Step 5: Network Topology
ISP Fiber ONT
      │
      ▼
Mikrotik CRS305 (10G backbone)
      │
      ├── Dell R620 (10G SFP+)
      │
      ▼
Ubiquiti US-24 (1G distribution)
      │
      ├── Access Points (PoE)
      ├── NAS (1G)
      └── Rest of the house
The Mikrotik handles 10G traffic between the server and NAS. The Ubiquiti handles everything else with PoE for access points.
Performance
Network Performance
| Test | Result |
|---|---|
| Server ↔ NAS (10G) | 600-800 MB/s |
| Server ↔ Internet | 1Gbps (ISP limited) |
| Client ↔ Server | 115 MB/s (1G saturating) |
Power Consumption
| State | Draw |
|---|---|
| Idle | 180W |
| Under load | 280W |
| With AC | Adds 30W for cooling |
For 24/7 operation, that’s ~$25/month in electricity. Cheap for what it provides.
What Runs Here
The R620 runs Proxmox with VMs for:
- Plex — Media server (with GPU passthrough for transcoding)
- Home Assistant — Smart home control
- Docker host — Various containers
- Pi-hole — Network ad blocking (redundant with main instance)
- TrueNAS — NFS storage for the other VMs
The rack also houses the main NAS (separate build) and networking gear.
Lessons Learned
The R620 sounds like a jet turbine until you tweak fan curves. Default settings assume datacenter noise floors — your living room is not a datacenter. IPMI lets you adjust fan thresholds.
Measure depth before buying. The R620 is deep. Make sure your rack (and room) can accommodate full-depth servers. I had to rearrange furniture to make it fit.
Plan for growth. I left 2U open. It’s already filled with a new NAS chassis. Leave room — homelabs have a way of expanding.
Label EVERYTHING. Future you will thank present you. Both ends of every cable. Every port. Every breaker. Trust me, six months from now you won’t remember what goes where.
Battery backup is essential. Power blips happen more often than you’d think. A UPS prevents database corruption and angry family members when the WiFi goes out.
Future Upgrades
- Sound dampening — A proper enclosure or dedicated room
- Cooling — Better airflow management
- More storage — The 2.5” bays in the R620 are limiting
- 10G everywhere — Slowly migrating clients to 10G
Conclusion
The rack transformed chaos into order. Everything has a place, cables are managed, and I can actually work on things without untangling wires first.
There’s something satisfying about walking past a rack of humming equipment in your own home. It’s the grown-up version of a fort. A very expensive, very loud, very useful fort.
If your homelab is creeping across the floor, invest in a rack. Your sanity (and your spouse) will thank you.
Questions about the build? Hit me up on the contact page. I’m always happy to talk homelab.

If you liked this, check out...
10G 20TB Plex NAS Build
Build a high-performance media server with 10G networking, massive storage, and the flexibility of Unraid. Stream anything, anywhere, to anyone.
Budget Proxmox Homelab Build (2024)
Build a powerful virtualization server for under $500. Run Plex, Home Assistant, Docker, and more with Proxmox VE on budget-friendly hardware.
Network Infrastructure Build
The backbone of every homelab: 10G switching, long-distance wireless links, and managed PoE. Building a network that actually works.
Comments
Powered by GitHub Discussions