Pi-hole Network Ad Blocker
Block ads on every device in your house with a $10 Raspberry Pi Zero. No browser extensions, no per-device setup, just sweet internet silence.

Table of Contents
- The Problem
- What We’re Building
- Features
- The Hardware
- Components
- Why Pi Zero?
- The Setup
- Step 1: Install Raspberry Pi OS
- Step 2: Install Pi-hole
- Step 3: Configure Your Router
- Step 4: Verify
- Performance
- Blocklists
- Advanced Features
- Per-Client Blocking
- Local DNS Records
- DHCP Server
- Dashboard
- Lessons Learned
- Troubleshooting
- Ads still appearing?
- Sites broken?
- Pi locked up?
- Conclusion
The Problem
Ads are everywhere. YouTube pre-rolls, banner ads, pop-ups, redirects, tracking pixels — the modern internet is a minefield of attention theft.
Browser extensions help, but they only work on devices where you install them. Your phone? Your smart TV? Your guests’ devices? They’re on their own.
What if you could block ads at the network level? Every device, every connection, zero configuration on the client side.
What We’re Building
A Pi-hole — a network-wide ad blocker that acts as your DNS server. It looks up domain names and blocks anything on its blacklists. Ads, trackers, malware domains — all stopped before they even load.
Features
- Network-wide blocking — Every device on your network
- Zero client config — Set it once, done
- Detailed statistics — See what’s being blocked
- Low power — Runs on a Pi Zero W
- Fast — DNS caching speeds up lookups
The Hardware
Components
| Component | Model | Price (Approx) |
|---|---|---|
| Computer | Raspberry Pi Zero W | $10 |
| Case | Basic plastic case | $5 |
| Power | Micro USB cable | $5 |
| Storage | 8GB microSD | $5 |
Total: ~$25
Yes, really. Twenty-five dollars for network-wide ad blocking. The Pi Zero W has built-in WiFi, so no extra adapters needed.
Why Pi Zero?
You don’t need much for a DNS server:
- Pi Zero W: Single core, 512MB RAM — overkill for DNS
- Pi 3 or 4: Total waste of horsepower
- Any Linux box: Sure, but the Pi is purpose-built
The Zero’s size is perfect. It’s tiny, draws barely any power, and can hide anywhere in your network closet.
The Setup
Step 1: Install Raspberry Pi OS
Flash Raspberry Pi OS Lite (no desktop needed) to your microSD card. Use the Raspberry Pi Imager — it’s foolproof.
Enable SSH and configure WiFi by adding files to the boot partition:
- Empty file named
ssh - File named
wpa_supplicant.confwith your WiFi credentials
Step 2: Install Pi-hole
One command:
curl -sSL https://install.pi-hole.net | bashThe installer walks you through:
- Select an upstream DNS provider (I use Cloudflare)
- Choose blocklists (default lists are excellent)
- Enable the web interface (yes, do this)
- Set an admin password
Step 3: Configure Your Router
This is the magic step. Set your Pi-hole as the DNS server for your network:
Option A: Router DNS Set the Pi’s IP as the primary DNS in your router’s DHCP settings. Every device gets it automatically.
Option B: Device DNS Configure each device manually. More work, but useful for testing.
I recommend Option A. Set it once, forget it forever.
Step 4: Verify
Visit http://pi.hole/admin from any device on your network. You should see the dashboard.
Test ad blocking: visit a site with ads. Watch the query log show blocked domains.
Performance
The Pi Zero handles DNS queries instantly:
| Metric | Result |
|---|---|
| Query latency | ≈1ms (local cache) |
| Block rate | ~25% of queries |
| Memory usage | ~50MB |
| CPU usage | ~5% |
| Power draw | ~1W |
Blocking 25% of DNS queries means 25% of network traffic is ads and trackers. That’s bandwidth saved, pages loaded faster, and sanity preserved.
Blocklists
Pi-hole comes with default lists, but you can add more:
| List | What it Blocks |
|---|---|
| Steven Black’s Hosts | Ads + malware |
| Firebog Lists | Comprehensive ad/tracker lists |
| OISD | Ads, trackers, malware |
| Energized Protection | Everything including adult content |
Be careful with aggressive lists — they can break sites. Start with defaults, add slowly, test thoroughly.
Advanced Features
Per-Client Blocking
Don’t want to block ads on your work laptop? Pi-hole can disable blocking for specific devices. Useful for:
- Devices that break with ad blocking
- Testing websites
- Family members who prefer ads (weird, but they exist)
Local DNS Records
Pi-hole can act as a local DNS server for your network:
nas.local→ 192.168.1.100plex.local→ 192.168.1.101- etc.
No more memorizing IP addresses.
DHCP Server
Pi-hole can replace your router’s DHCP server. This enables:
- Per-client DNS control
- Better hostname resolution
- Easier management
I stick with my router’s DHCP, but the option exists.
Dashboard
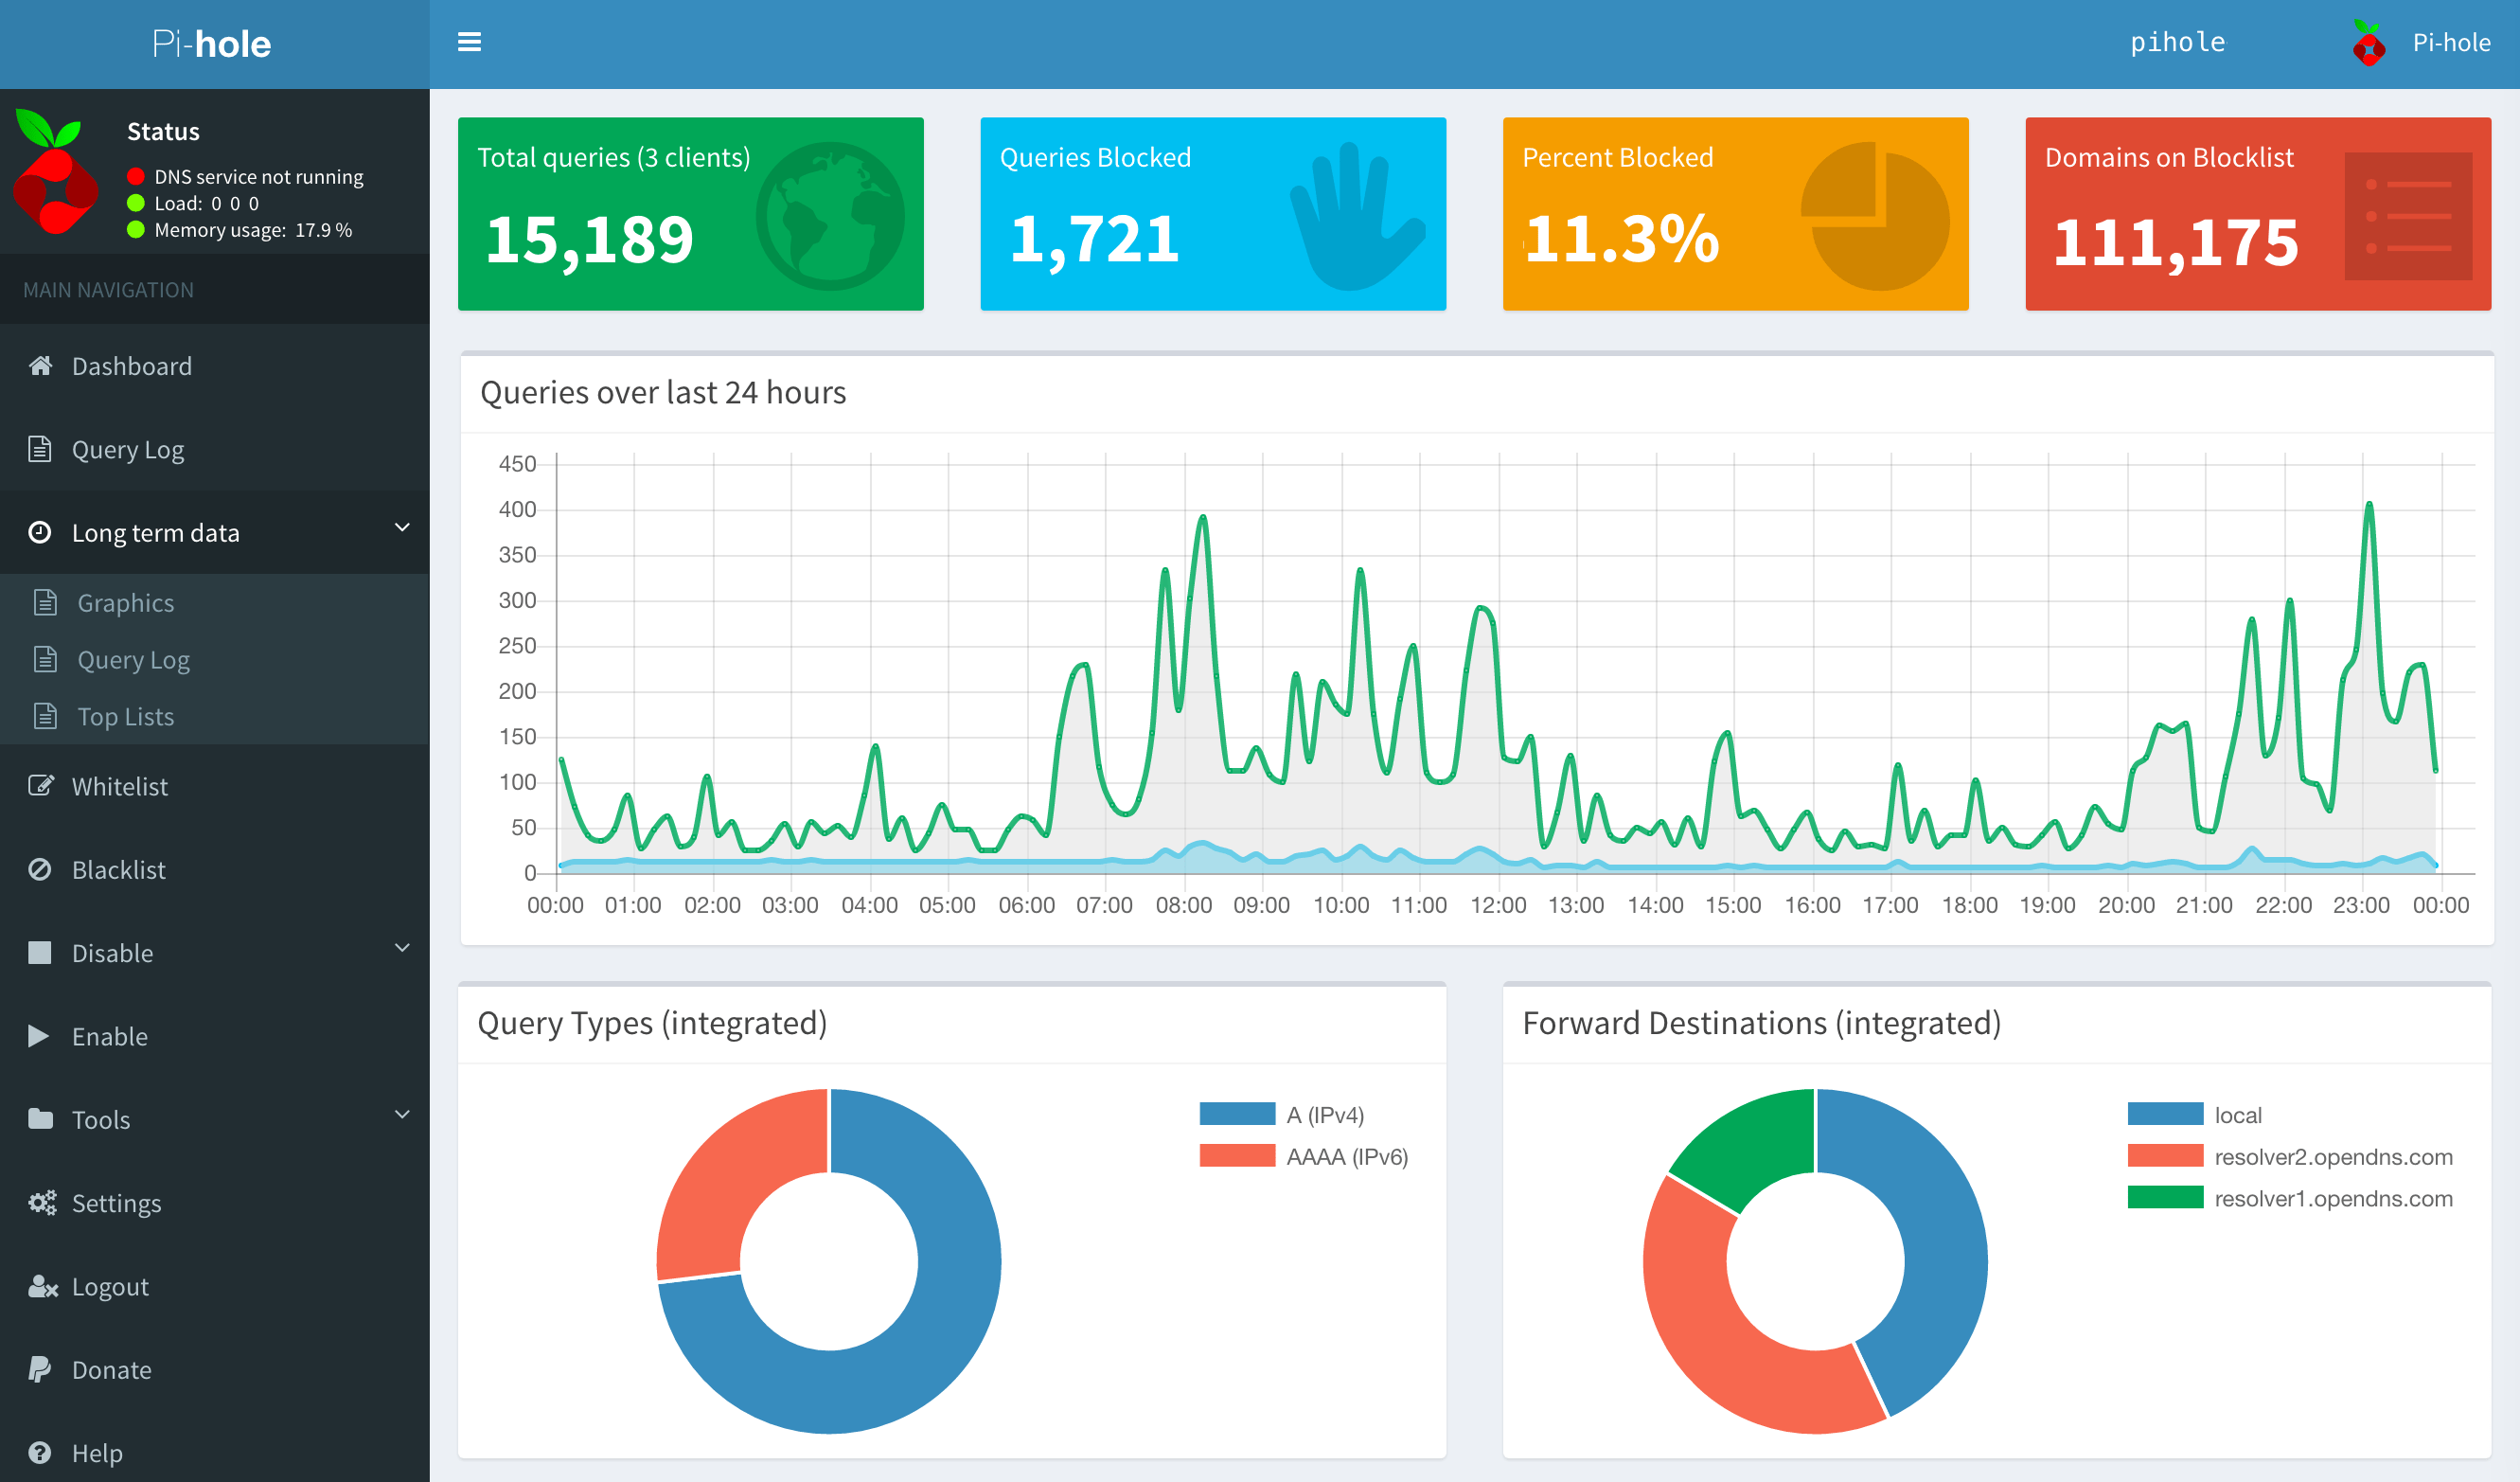
The web interface shows:
- Queries over time
- Top blocked domains
- Top clients
- Query types
Great for satisfying “how many ads did I block today?” curiosity.
Lessons Learned
Set a static IP for your Pi-hole. The Pi needs a predictable address. If the IP changes, every device on your network loses DNS. Reserve an IP in your router’s DHCP settings.
Backup your config regularly. Pi-hole has a Teleporter feature for exporting settings. Use it. When (not if) your SD card dies, you’ll be glad you did.
Don’t go crazy with blocklists. More lists ≠ better blocking. Too many = broken sites and slow queries. Start with the defaults and add gradually.
When sites break, check the query log first. Whitelist the blocked domain that’s causing issues. Most problems are solved with a single whitelist entry.
If the Pi dies, you want a backup. Set a secondary DNS (like 8.8.8.8 or 1.1.1.1) in your router so you’re not completely offline if the Pi-hole goes down.
Troubleshooting
Ads still appearing?
- Clear your browser cache
- Some apps hardcode DNS (bypass Pi-hole)
- Check if Pi-hole is actually being used (visit pi.hole/admin)
Sites broken?
- Check the query log for blocked domains
- Whitelist the domain causing issues
- Temporary disable blocking for testing
Pi locked up?
The Pi Zero is reliable but can freeze if the SD card corrupts. Use a quality card and consider a UPS for clean shutdowns.
Conclusion
For $25 and 30 minutes of setup, you get:
- Network-wide ad blocking
- Detailed statistics
- Faster browsing (less garbage to load)
- Privacy (fewer trackers)
The Pi-hole runs 24/7, uses almost no power, and silently protects every device on your network. It’s one of those “set it and forget it” projects that pays dividends every single day.
If you’re not running a Pi-hole, you’re leaving ads, trackers, and bandwidth on the table.
Questions? Hit me up on the contact page. I’m always happy to help with Pi-hole setups.

If you liked this, check out...
Network Infrastructure Build
The backbone of every homelab: 10G switching, long-distance wireless links, and managed PoE. Building a network that actually works.
Homelab Server Rack Build
One rack to rule them all. A 25U server rack housing the Dell R620, switches, PDUs, and all the networking gear needed for a serious homelab.
Comments
Powered by GitHub Discussions