Zigbee2MQTT: Smart Home Device Integration
Connect Zigbee devices to your smart home with Zigbee2MQTT. Learn installation, device pairing, and Home Assistant integration for seamless automation.
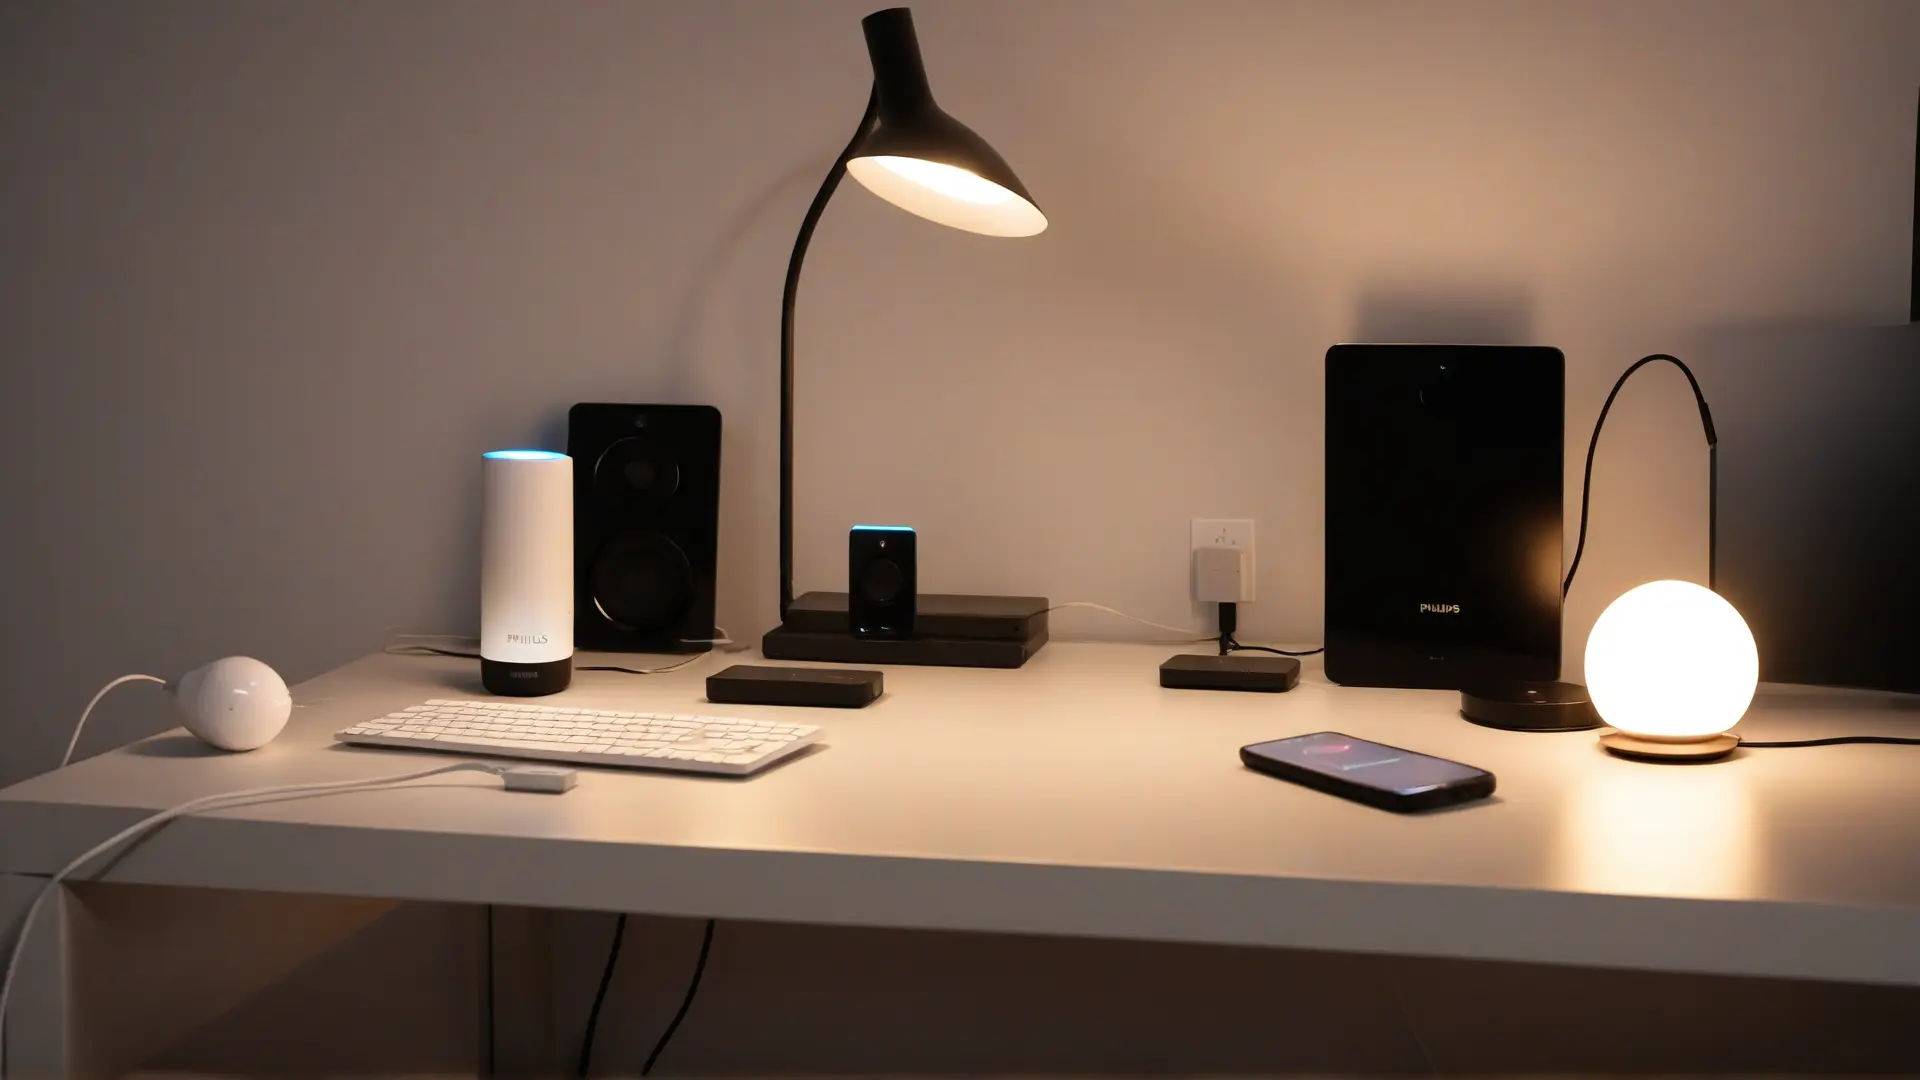
Table of Contents
- What is Zigbee2MQTT?
- Hardware Requirements
- The Zigbee Coordinator
- Host System Options
- MQTT Broker
- Installation
- Option 1: Docker (Recommended)
- Option 2: Home Assistant Add-on
- Option 3: Bare Metal Installation
- Configuration
- Finding Your Coordinator Port
- Device Pairing
- Enable Pairing Mode
- Pair Individual Devices
- Pairing Best Practices
- Understanding the Mesh Network
- The Three Device Roles
- Strengthening Your Mesh
- Home Assistant Integration
- Automatic Discovery
- Controlling Devices
- Common Issues & Solutions
- Device Won’t Pair
- Devices Dropping Offline
- Home Assistant Shows Unavailable
- Backing Up Your Network
- Why Choose Zigbee2MQTT Over Alternatives?
- Getting Started Checklist
- Final Thoughts
If you’ve ever felt trapped by proprietary smart home hubs—constantly checking app compatibility, waiting for cloud servers, or dealing with devices that simply stopped working when the manufacturer sunsetted their service—Zigbee2MQTT is the liberation you’ve been looking for.
This open-source bridge connects virtually any Zigbee device to your smart home setup, breaking free from vendor lock-in and giving you complete control over your automation ecosystem.
What is Zigbee2MQTT?
Zigbee2MQTT acts as a universal translator between your Zigbee devices and the MQTT protocol. Instead of juggling multiple proprietary apps and hubs, you get a single, unified interface for all your smart home devices.
Why this matters:
- No vendor lock-in: Switch platforms without replacing devices
- Local control: Works without internet access
- 5,200+ supported devices: From 557 different vendors
- Free and open source: Community-maintained, no subscriptions
Think of it as the USB-C of smart home protocols—one standard to rule them all.
Hardware Requirements
Before diving into installation, you’ll need a few components.
The Zigbee Coordinator
This USB dongle (or network adapter) serves as the brain of your Zigbee network. It’s the bridge between your computer and all your wireless devices.
Top recommendations:
| Adapter | Type | Notes |
|---|---|---|
| Sonoff ZBDongle-E | EmberZNet | Best balance of price/performance |
| Sonoff ZBDongle-P | zStack (CC2652P) | Higher power (20dBm TX) |
| SMLight SLZB-06M | Ethernet | Remote coordinator over network |
:::tip Always use a USB extension cable (50cm minimum). Plugging the coordinator directly into your server exposes it to interference from USB 3.0 ports and other electronics—this single change eliminates 90% of connectivity problems. :::
The older CC2530 and CC2531 adapters are budget options but suffer from poor range and stability. If you’re starting fresh, spend the extra $10-15 for a modern coordinator.
Host System Options
Zigbee2MQTT runs on almost anything:
- Raspberry Pi (Pi 4/5 recommended)
- Intel NUC or mini PC
- Docker container on any Linux server
- Proxmox VM alongside other services
- Home Assistant as an add-on
MQTT Broker
You’ll need an MQTT broker to handle messaging. Mosquitto is the standard choice—it’s lightweight, reliable, and included in most smart home distributions.
Installation
Option 1: Docker (Recommended)
Docker isolates Zigbee2MQTT from your system, ensuring consistent behavior and easy updates.
Create a docker-compose.yml:
services:
  zigbee2mqtt:
    container_name: zigbee2mqtt
    image: ghcr.io/koenkk/zigbee2mqtt
    restart: unless-stopped
    volumes:
      - ./data:/app/data
      - /run/udev:/run/udev:ro
    ports:
      - "8080:8080"
    environment:
      - TZ=America/New_York
    devices:
      # Update this path to match your adapter
      - /dev/serial/by-id/usb-Texas_Instruments_TI_CC2531_USB_CDC___0X00124B0018ED3DDF-if00:/dev/ttyACM0
Find your adapter path:
ls -l /dev/serial/by-id/
# Look for your coordinator's entry
Start the container:
docker compose up -dOn first run, Zigbee2MQTT opens a configuration wizard at http://localhost:8080. Follow the prompts to set up your coordinator and MQTT connection.
Option 2: Home Assistant Add-on
If you’re already running Home Assistant, the add-on is the simplest path:
- Navigate to Settings → Add-ons → Add-on Store
- Click the menu (⋮) → Repositories
- Add:
https://github.com/zigbee2mqtt/hassio-zigbee2mqtt - Search for “Zigbee2MQTT” and install
The configuration is almost identical to the Docker setup, just managed through Home Assistant’s UI.
Option 3: Bare Metal Installation
For those who prefer direct installation:
# Install Node.js and dependencies
sudo apt-get install -y curl git make g++ gcc libsystemd-dev
sudo curl -fsSL https://deb.nodesource.com/setup_lts.x | sudo -E bash -
sudo apt-get install -y nodejs
corepack enable

# Clone and install
git clone --depth 1 https://github.com/Koenkk/zigbee2mqtt.git /opt/zigbee2mqtt
cd /opt/zigbee2mqtt
pnpm install --frozen-lockfile

# Start
pnpm start
For production use, create a systemd service:
sudo nano /etc/systemd/system/zigbee2mqtt.service[Unit]
Description=Zigbee2MQTT
After=network.target
[Service]
Environment=NODE_ENV=production
ExecStart=/usr/bin/node index.js
WorkingDirectory=/opt/zigbee2mqtt
Restart=always
User=pi
[Install]
WantedBy=multi-user.targetEnable and start:
sudo systemctl enable --now zigbee2mqttConfiguration
The main configuration lives in data/configuration.yaml. Here’s a practical starting point:
mqtt:
  base_topic: zigbee2mqtt
  server: 'mqtt://core-mosquitto:1883'
  # If your MQTT broker requires authentication:
  user: mqtt_user
  password: your_secure_password

serial:
  port: /dev/ttyACM0
  # Specify adapter type for better performance
  adapter: zstack  # Use 'ember' for EmberZNet adapters

homeassistant:
  enabled: true  # Auto-discovery for Home Assistant

frontend:
  port: 8080  # Web interface

advanced:
  network_key: GENERATE  # Creates unique network key
  pan_id: GENERATE       # Network ID
  log_level: info
:::warning
The network_key is critical—back it up! If you lose it, you’ll need to re-pair every device.
:::
Finding Your Coordinator Port
Different systems name USB devices differently. The most reliable method:
ls -la /dev/serial/by-id/You’ll see something like:
usb-Texas_Instruments_TI_CC2531_USB_CDC___0X00124B0018ED3DDF-if00Use this full path in your configuration—it remains consistent across reboots.
Device Pairing
Zigbee2MQTT makes adding devices straightforward.
Enable Pairing Mode
- Open the Zigbee2MQTT web interface (
http://your-server:8080) - Click “Permit join (All)” in the top right
- The network opens for approximately 120 seconds
Pair Individual Devices
Each device enters pairing mode differently:
| Device Type | Pairing Method |
|---|---|
| Smart bulbs | Power cycle 5 times in quick succession |
| Switches/relays | Hold reset button 5-10 seconds |
| Sensors | Usually auto-pair after battery insertion |
| Buttons | Long-press the pair/reset button |
Watch the logs for success:
Zigbee2MQTT:info: Successfully interviewed '0x00158d0001dc126a'
Zigbee2MQTT:info: Device '0x00158d0001dc126a' is supported
Zigbee2MQTT:info: Detected device is 'Aqara temperature/humidity sensor'
Pairing Best Practices
- One device at a time: Avoid pairing multiple devices simultaneously
- Stay close: Keep devices within arm’s reach during initial pairing
- Patience: Allow the mesh network 24-48 hours to stabilize before moving devices to final locations
Understanding the Mesh Network
Zigbee isn’t just a direct connection—it’s a mesh network where devices relay signals for each other.
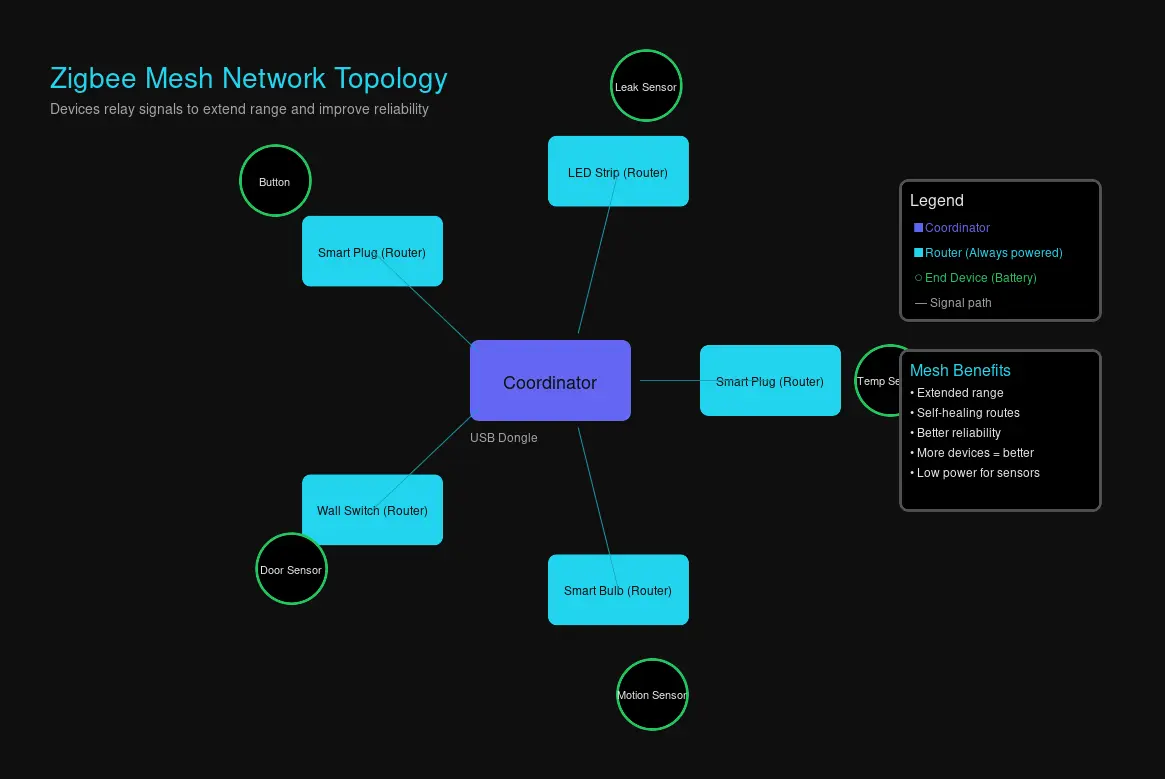
The Three Device Roles
Coordinator (Your USB dongle)
- Manages the entire network
- Stores device addresses and security keys
- Only one per network
Routers (Always-on, powered devices)
- Smart plugs, bulbs, wall switches
- Relay signals to extend range
- More routers = better coverage
End Devices (Battery-powered)
- Sensors, buttons, remotes
- Sleep most of the time to save power
- Can only talk through routers
Strengthening Your Mesh
If devices keep dropping offline or responding slowly:
- Add more routers: A single smart plug in each room dramatically improves coverage
- Use USB extension: 50cm+ between coordinator and server
- Avoid WiFi congestion: Change Zigbee channel (11, 15, 20, 25) to avoid overlap with WiFi
- Position centrally: Your coordinator should be near the center of your home
Home Assistant Integration
The reason most people choose Zigbee2MQTT? First-class Home Assistant support.
Automatic Discovery
Enable discovery in your configuration:
homeassistant:
  enabled: true
When you add the MQTT integration to Home Assistant (Settings → Devices & Services → Add Integration → MQTT), devices appear automatically with proper names, icons, and capabilities.
Controlling Devices
Every Zigbee2MQTT device publishes to MQTT topics:
zigbee2mqtt/bedroom_lamp {"state":"ON","brightness":254,"color_temp":350}You can interact directly:
# Turn on a light
automation:
  - alias: "Evening lights"
    trigger:
      - platform: time
        at: "18:00:00"
    action:
      - service: mqtt.publish
        data:
          topic: zigbee2mqtt/bedroom_lamp/set
          payload: '{"state":"ON","brightness":200}'
But the real magic happens through Home Assistant entities—your devices appear as native lights, sensors, and switches.
Common Issues & Solutions
Device Won’t Pair
- Confirm pairing mode is enabled (green indicator in UI)
- Factory reset the device (check manufacturer instructions)
- Move closer to the coordinator
- Check for conflicting Zigbee networks (Hue hub, SmartThings)
Devices Dropping Offline
- Add more router devices (plugs, bulbs)
- Check coordinator placement—move away from USB 3.0 ports
- Verify power supply (routers need stable power)
- Consider AwoX devices—they’re known for network instability
Home Assistant Shows Unavailable
- Verify MQTT broker is running
- Check MQTT credentials in configuration
- Confirm Zigbee2MQTT is connected (
zigbee2mqtt/bridge/stateshould showonline)
Backing Up Your Network
Before making changes, download a backup:
# Backup stored automatically in:
ls /opt/zigbee2mqtt/data/coordinator_backup.json
Or from the web interface: Settings → Advanced → Backup
This file contains your network key and device list—essential for recovery.
Why Choose Zigbee2MQTT Over Alternatives?
| Feature | Zigbee2MQTT | ZHA (Home Assistant) | Proprietary Hubs |
|---|---|---|---|
| Device support | 5,200+ | 3,000+ | Limited per brand |
| Local control | ✓ | ✓ | Varies |
| Cost | Free | Free | $50-150 |
| Customization | Extensive | Moderate | None |
| Independence | Any MQTT client | Home Assistant only | Brand ecosystem |
ZHA is excellent for beginners, but Zigbee2MQTT wins if you want:
- Granular control over RF settings
- Access to raw MQTT messages
- Use across multiple platforms (not just Home Assistant)
- Advanced debugging tools
Getting Started Checklist
- Purchase a recommended coordinator
- Install MQTT broker (Mosquitto)
- Set up Zigbee2MQTT (Docker recommended)
- Configure coordinator port and MQTT connection
- Enable pairing mode
- Add your first device
- Test in Home Assistant
- Add router devices for mesh stability
- Back up your network key
Final Thoughts
Zigbee2MQTT removes the artificial barriers manufacturers build around their ecosystems. No more “works with SmartThings but not Home Assistant” limitations. No more cloud dependencies for basic on/off commands.
Your devices should work for you, not the other way around.
Ready to break free? Grab a coordinator, install Zigbee2MQTT, and take control of your smart home.
Resources

Comments
Powered by GitHub Discussions