NetBox: The Ultimate DCIM/IPAM Solution for Your Homelab
Stop managing your network with spreadsheets. NetBox gives you enterprise-grade IP address management and infrastructure documentation that scales from a router to a full data center. Here's how to deploy it in your homelab.
Table of Contents
- What Is NetBox?
- Key Features
- Why NetBox for Homelab?
- 1. Never Lose an IP Again
- 2. Visual Rack Documentation
- 3. Cable Trace Everything
- 4. Automation-Ready
- 5. Change Tracking
- NetBox vs. Alternatives
- Architecture
- Installation with Docker Compose
- Requirements
- Step 1: Create Project Directory
- Step 2: Clone NetBox Docker Repository
- Step 3: Create Configuration Override
- Step 4: Set Environment Variables
- Step 5: Pull and Start
- Step 6: Create Admin User
- Step 7: Access NetBox
- Initial Configuration
- 1. Create Sites and Regions
- 2. Define Manufacturers and Device Types
- 3. Create Racks
- 4. Add Devices
- 5. Configure IPAM
- 6. Cable Your Devices
- Best Practices for Homelab NetBox
- 1. Start Simple
- 2. Use Device Roles
- 3. Create a Naming Convention
- 4. Use Tags Liberally
- 5. Set Up Change Notifications
- 6. Leverage the API
- Plugin Ecosystem
- Integration Examples
- Ansible Dynamic Inventory
- Prometheus Metrics
- Custom Reports
- Troubleshooting
- NetBox Won’t Start
- Database Migrations Fail
- Can’t Login After Restore
- API Returns 403 Forbidden
- Backup and Recovery
- Resource Usage
- Summary
- Next Steps
Your homelab has 47 IP addresses. Your NAS is at .10, your Proxmox host at .20, your Pi-hole at .50, and you think the printer is somewhere around .100. The VLAN spreadsheet hasn’t been updated since you added that second switch six months ago. When something breaks, you spend the first hour just remembering where things are.
NetBox is the answer. It’s an open-source DCIM (Data Center Infrastructure Management) and IPAM (IP Address Management) tool that gives you a single source of truth for your entire network. Born at DigitalOcean and now maintained by NetBox Labs, it’s what the pros use—and it runs on a Raspberry Pi.
What Is NetBox?
NetBox is infrastructure documentation as code. It doesn’t monitor your network or push configurations. Instead, it maintains a pristine record of what your network should look like. Every device, every cable, every IP address, every VLAN—documented and queryable through both a web interface and a REST API.
This separation of concerns is deliberate. NetBox provides the “source of truth” that other tools consume:
- Ansible pulls inventory from NetBox to configure devices
- Monitoring systems get their device lists from NetBox
- Provisioning tools request the next available IP from NetBox
The data model mirrors reality: IP addresses are assigned to interfaces, not devices. Interfaces belong to devices. Devices sit in racks. Racks are in sites. Every relationship is explicit and traceable.
Key Features
| Category | What You Get |
|---|---|
| IPAM | IPv4/IPv6 address management, prefix allocation, VRFs |
| DCIM | Sites, racks, devices, cables, power chains |
| Network | VLANs, VLAN groups, ASNs, circuits, wireless links |
| Virtualization | Virtual machines, clusters, interfaces |
| Security | VPN tunnels, IKE/IPSec policies, L2VPNs |
| Automation | REST API, GraphQL, webhooks, custom scripts |
| Extensibility | Plugins, custom fields, custom validation rules |
Why NetBox for Homelab?
Before NetBox, you probably used:
- A spreadsheet for IPs (outdated the moment you save it)
- Sticky notes for cable connections (lost within a week)
- Memory for rack layouts (forgetting as you age)
- Nothing at all (chaos)
NetBox replaces all of that with a proper database backed by a web interface and API. Here’s why it matters:
1. Never Lose an IP Again
The IPAM module tracks every IP address across all your networks:
192.168.1.0/24
├── 192.168.1.1    Gateway (pfSense)
├── 192.168.1.10   TrueNAS NAS
├── 192.168.1.20   Proxmox Host 1
├── 192.168.1.21   Proxmox Host 2
├── 192.168.1.50   Pi-hole DNS
└── 192.168.1.100  HP LaserJet
Query the API for the next available IP. Reserve IPs for future use. Mark IPs as deprecated. Track DHCP assignments. All in one place.
2. Visual Rack Documentation
The rack elevation feature generates SVG diagrams showing exactly where each device sits:
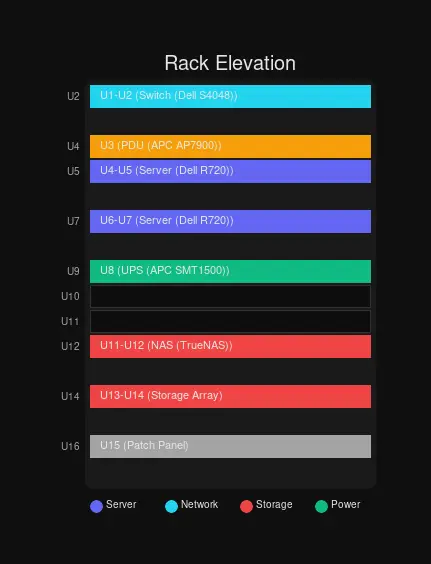 Rack elevations are generated automatically from your data
You define device types with their height (in rack units), and NetBox renders the rack showing occupied and free space. No more guessing whether a 2U server will fit.
3. Cable Trace Everything
Ever spent an hour tracing which cable goes where? NetBox tracks every connection:
 NetBox architecture with reverse proxy, application server, and databases
Connect port 1 on Switch A to port 2 on Switch B. Later, query the path: “What’s on the other end of Switch A, Port 1?” NetBox tells you every jump, every patch panel, every endpoint.
4. Automation-Ready
Everything in NetBox is accessible via API. This means:
# Get next available IP
curl -X POST https://netbox/api/ipam/prefixes/1/available-ips/ \
  -H "Authorization: Token $NETBOX_TOKEN" \
  -H "Content-Type: application/json" \
  -d '{}'

# Response: {"address": "192.168.1.101/24", ...}
Your provisioning scripts can request IPs programmatically. Your Ansible playbooks can pull the full device list:
# ansible.cfg
[inventory]
enable_plugins = netbox.netbox.nb_inventory

[inventory_plugin_netbox_netbox_nb_inventory]
plugin = netbox.netbox.nb_inventory
api_endpoint = https://netbox.yourdomain.com
token = ${NETBOX_TOKEN}
5. Change Tracking
Every change is logged with who made it, when, and what changed:
Device "proxmox-host-1" modified by anthony:
  - primary_ip4: 192.168.1.20 → 192.168.1.21
  - status: active → offline
  - tags: added "maintenance"
Changed at 2026-03-04 14:32:15
Audit trails are invaluable when troubleshooting—“Who changed this?” is always answerable.
NetBox vs. Alternatives
| Feature | NetBox | phpIPAM | Nautobot | Spreadsheets |
|---|---|---|---|---|
| IPAM | ✅ Full | ✅ Full | ✅ Full | ❌ Manual |
| DCIM | ✅ Full | ❌ None | ✅ Full | ❌ None |
| Rack Visualization | ✅ SVG | ❌ | ✅ | ❌ |
| Cable Management | ✅ Full | ❌ | ✅ | ❌ |
| REST API | ✅ Excellent | ✅ Basic | ✅ Excellent | ❌ |
| Plugin System | ✅ 100+ plugins | ❌ | ✅ | ❌ |
| Active Development | ✅ Very Active | ⚠️ Slow | ✅ Active | ❌ |
| Docker Support | ✅ Official | ✅ Community | ✅ Official | ❌ |
| Resource Usage | ~500MB | ~200MB | ~600MB | 0 |
| Learning Curve | Medium | Easy | Medium | Easy |
NetBox is the clear winner for homelabbers who want professional-grade infrastructure documentation without enterprise pricing.
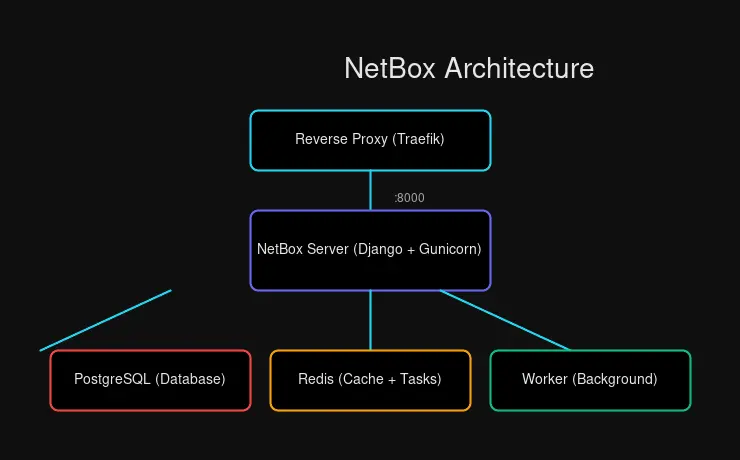
Architecture
NetBox is a Django application backed by PostgreSQL, with Redis for caching and task queuing:
┌─────────────────────────────────────────────┐
│           Reverse Proxy (Traefik)            │
│                   :443                       │
└────────────────────┬────────────────────────┘
                     │
┌────────────────────▼────────────────────────┐
│               NetBox Server                  │
│            (Django + Gunicorn)              │
│                  :8000                       │
└────────────────────┬────────────────────────┘
                     │
         ┌───────────┼───────────┐
         ▼           ▼           ▼
┌─────────────┐ ┌─────────────┐ ┌─────────────┐
│ PostgreSQL  │ │    Redis    │ │   Worker    │
│  (Primary   │ │  (Caching   │ │ (Background │
│   Store)    │ │   + Tasks)  │ │   Tasks)   │
└─────────────┘ └─────────────┘ └─────────────┘
Components:
- PostgreSQL: Primary data store (PostgreSQL 14+ required)
- Redis: Caching and background task queue
- NetBox Server: Django application handling web UI and API
- Worker: Processes background tasks (webhooks, scripts, housekeeping)
The official Docker image bundles everything except PostgreSQL and Redis, making deployment straightforward.
Installation with Docker Compose
Requirements
| Resource | Minimum | Recommended |
|---|---|---|
| CPU | 1 core | 2+ cores |
| RAM | 1GB | 2GB+ |
| Storage | 5GB | 10GB+ |
| Docker | 20.10.10+ | Latest |
| Docker Compose | 1.28.0+ | v2 |
NetBox runs comfortably on a Raspberry Pi 4, making it perfect for homelab deployment.
Step 1: Create Project Directory
mkdir ~/netbox && cd ~/netboxStep 2: Clone NetBox Docker Repository
git clone -b release https://github.com/netbox-community/netbox-docker.git .Step 3: Create Configuration Override
cp docker-compose.override.yml.example docker-compose.override.ymlEdit docker-compose.override.yml to expose NetBox and configure for Traefik:
version: '3.4'
services:
  netbox:
    ports:
      - 8000:8080
    labels:
      - "traefik.enable=true"
      - "traefik.http.routers.netbox.rule=Host(`netbox.yourdomain.com`)"
      - "traefik.http.routers.netbox.entrypoints=websecure"
      - "traefik.http.routers.netbox.tls.certresolver=letsencrypt"
      - "traefik.http.services.netbox.loadbalancer.server.port=8080"

  netbox-worker:
    <<: *netbox
    labels: []

  netbox-housekeeping:
    <<: *netbox
    labels: []
Step 4: Set Environment Variables
Create or edit .env:
# Superuser credentials (for initial setup)
SUPERUSER_NAME=admin
SUPERUSER_EMAIL=[email protected]
SUPERUSER_PASSWORD=your-secure-password

# Database configuration
DB_NAME=netbox
DB_USER=netbox
DB_PASSWORD=$(openssl rand -base64 36 | tr -d '\n')

# Redis configuration
REDIS_PASSWORD=$(openssl rand -base64 36 | tr -d '\n')
Generate the passwords:
echo "DB_PASSWORD=$(openssl rand -base64 36 | tr -d '\n')" >> .env
echo "REDIS_PASSWORD=$(openssl rand -base64 36 | tr -d '\n')" >> .env
Step 5: Pull and Start
docker compose pull
docker compose up -d
Step 6: Create Admin User
If you didn’t set SUPERUSER_* variables:
docker compose exec netbox /opt/netbox/netbox/manage.py createsuperuserStep 7: Access NetBox
Open your browser to https://netbox.yourdomain.com/. You should see the NetBox dashboard.
Initial Configuration
1. Create Sites and Regions
Regions contain sites. Sites contain racks and devices.
Regions → DCIM > Regions → Add:
- Name:
Home - Slug:
home
Sites → DCIM > Sites → Add:
- Name:
Basement Lab - Slug:
basement-lab - Region:
Home - Status:
Active
2. Define Manufacturers and Device Types
Manufacturers → DCIM > Manufacturers → Add:
- Name:
Dell(or Supermicro, HP, etc.)
Device Types → DCIM > Device Types → Add:
- Manufacturer:
Dell - Model:
PowerEdge R720 - Slug:
dell-r720 - Height:
2(rack units)
Add component templates:
- Console ports
- Power ports
- Network interfaces (eth0, eth1, etc.)
3. Create Racks
Racks → DCIM > Racks → Add:
- Name:
Main Rack - Site:
Basement Lab - Height:
42(units) - Location: (optional)
The rack elevation appears automatically when you add devices.
4. Add Devices
Devices → DCIM > Devices → Add:
- Name:
proxmox-host-1 - Device Type:
Dell PowerEdge R720 - Role:
Server - Site:
Basement Lab - Rack:
Main Rack - Position:
1(starts at U1 for a 2U server) - Face:
Front
5. Configure IPAM
Prefixes → IPAM > Prefixes → Add:
- Prefix:
192.168.1.0/24 - Site:
Basement Lab - Status:
Active - Description:
Home LAN
Now you can allocate IPs from this prefix to device interfaces.
6. Cable Your Devices
Cables → DCIM > Cables → Add:
- Termination A: Device
proxmox-host-1, Interfaceeth0 - Termination B: Device
switch-main, Interfaceport-1 - Type:
Cat6a - Length:
1meter
Best Practices for Homelab NetBox
1. Start Simple
Document what you have before planning what you want. Your first task is recording reality, not designing the future. Add existing devices, assign existing IPs, connect existing cables.
2. Use Device Roles
Create roles for organization:
Server— Proxmox hosts, storage serversNetwork— Switches, routers, firewallsManagement— IPMI consoles, PDUsIoT— Smart home devicesClient— Desktops, laptops
3. Create a Naming Convention
Consistent naming makes everything easier:
| Device Type | Convention | Example |
|---|---|---|
| Physical Servers | <role>-<number> | proxmox-01, nas-01 |
| Virtual Machines | <app>-<env> | grafana-prod, pihole-lab |
| Network Devices | <type>-<location>-<number> | sw-basement-01 |
| IP Prefixes | Descriptive names | home-lan, iot-vlan, mgmt-vlan |
4. Use Tags Liberally
Tags add flexible categorization without rigid hierarchies:
productionvstestingmonitoredfor devices in Grafanacriticalfor always-on servicesto-upgradefor pending maintenance
5. Set Up Change Notifications
Configure webhooks to notify you of changes:
Operations > Webhooks → Add:
- Name:
Slack Notification - URL:
https://hooks.slack.com/services/YOUR/WEBHOOK/URL - Content Type:
application/json - HTTP Method:
POST - Events: Select what you want to track
6. Leverage the API
Every action in NetBox has an API endpoint. Automate repetitive tasks:
# List all devices
curl -H "Authorization: Token $NETBOX_TOKEN" \
  https://netbox.yourdomain.com/api/dcim/devices/

# Create a new prefix
curl -X POST -H "Authorization: Token $NETBOX_TOKEN" \
  -H "Content-Type: application/json" \
  -d '{"prefix": "10.0.0.0/24", "description": "New VLAN"}' \
  https://netbox.yourdomain.com/api/ipam/prefixes/

# Get next available IP
curl -X POST -H "Authorization: Token $NETBOX_TOKEN" \
  https://netbox.yourdomain.com/api/ipam/prefixes/1/available-ips/
Plugin Ecosystem
NetBox’s plugin system enables community extensions. Notable plugins for homelab:
| Plugin | Purpose |
|---|---|
netbox-topology-views | Visual network topology |
netbox-dashboards | Custom dashboards |
netbox-metrics | Prometheus metrics export |
netbox-tenancy | Multi-tenant management |
netbox-attachments | File attachments to objects |
Install plugins by adding to configuration.py:
PLUGINS = [
    'netbox_topology_views',
    'netbox_metrics',
]
Integration Examples
Ansible Dynamic Inventory
Point Ansible at NetBox for automatic inventory:
# inventory/netbox.yml
plugin: netbox.netbox.nb_inventory
api_endpoint: https://netbox.yourdomain.com
token: ${NETBOX_TOKEN}
validate_certs: true
group_by:
  - device_role
  - site
  - tags
Run:
ansible all -i inventory/netbox.yml -m pingPrometheus Metrics
Export device inventory as Prometheus metrics:
# prometheus.yml
scrape_configs:
  - job_name: 'netbox'
    static_configs:
      - targets: ['netbox-exporter:8000']
Use the netbox-metrics plugin to generate metrics about your infrastructure.
Custom Reports
Write Python scripts that run inside NetBox:
# reports/switch_report.py
from dcim.models import Device
from extras.reports import Report

class SwitchPortReport(Report):
    description = "Check for empty ports on switches"

    def test_empty_ports(self):
        for device in Device.objects.filter(role__name='Switch'):
            used = device.interfaces.filter(cable__isnull=False).count()
            total = device.interfaces.count()
            if used / total < 0.5:
                self.log_warning(device, f"Only {used}/{total} ports used")
Run from Reports > Custom Reports.
Troubleshooting
NetBox Won’t Start
Check container logs:
docker compose logs netboxCommon issues:
- PostgreSQL not ready → Wait 30 seconds and retry
- Missing migrations → Run
docker compose exec netbox /opt/netbox/netbox/manage.py migrate - Permission errors → Check volume permissions
Database Migrations Fail
# Enter container and fix
docker compose exec netbox bash
cd /opt/netbox/netbox
python manage.py migrate --plan
python manage.py migrate
Can’t Login After Restore
Restoring from backup may require superuser recreation:
docker compose exec netbox /opt/netbox/netbox/manage.py createsuperuserAPI Returns 403 Forbidden
Check your token permissions:
# Verify token works
curl -H "Authorization: Token $NETBOX_TOKEN" \
  https://netbox.yourdomain.com/api/users/tokens/
Backup and Recovery
NetBox stores everything in PostgreSQL. Back it up:
# Backup
docker compose exec db pg_dump -U netbox netbox > netbox_backup.sql

# Restore
cat netbox_backup.sql | docker compose exec -T db psql -U netbox netbox
For media files (uploads, exports):
# Backup media
docker compose exec netbox tar czf /tmp/media.tar.gz /opt/netbox/netbox/media/
docker cp netbox:/tmp/media.tar.gz ./netbox_media_backup.tar.gz

# Restore
docker cp ./netbox_media_backup.tar.gz netbox:/tmp/
docker compose exec netbox tar xzf /tmp/media.tar.gz -C /
Resource Usage
In my homelab testing on an Intel N100 mini PC:
| Metric | Idle | Under Load |
|---|---|---|
| Memory | ~450MB | ~600MB |
| CPU | ~2% | ~15% |
| Disk I/O | Minimal | Writes on changes |
A Raspberry Pi 4 with 4GB RAM handles NetBox comfortably for homelab scale (hundreds of devices, thousands of IPs).
Summary
NetBox transforms infrastructure chaos into structured documentation. For homelabbers, it offers:
- Single source of truth — Every device, IP, and cable recorded
- Visual documentation — Rack elevations and cable traces
- Automation-ready — Full REST and GraphQL APIs
- Professional-grade — Same tool used by Fortune 500 companies
- Free and self-hosted — No licensing costs, no cloud dependency
Start with your core infrastructure: router, switches, servers. Document what exists today. Let the database grow organically as you add devices. Within weeks, you’ll wonder how you ever managed without it.
The transition from spreadsheet chaos to NetBox order takes effort, but the payoff is clarity. When someone asks “What’s the IP of the backup NAS?” you’ll answer in seconds. When you need to plan a network expansion, you’ll know exactly which IPs and switch ports are available. When troubleshooting, you’ll trace cables through NetBox instead of crawling under desks.
That’s the value of infrastructure as code—homelab scale.
Next Steps
- Add your existing devices — Import from spreadsheets or add manually
- Configure webhooks — Get notified on changes
- Explore plugins — Topology views, metrics, dashboards
- Connect Ansible — Automate with dynamic inventory
- Write custom reports — Find issues before they become problems


Comments
Powered by GitHub Discussions