Building a Portable Live Sound Rack: A Practical Guide
Learn how to build a professional portable live sound rig from the ground up. Real-world tips on rack components, signal flow, power management, and case selection based on actual gigging experience.
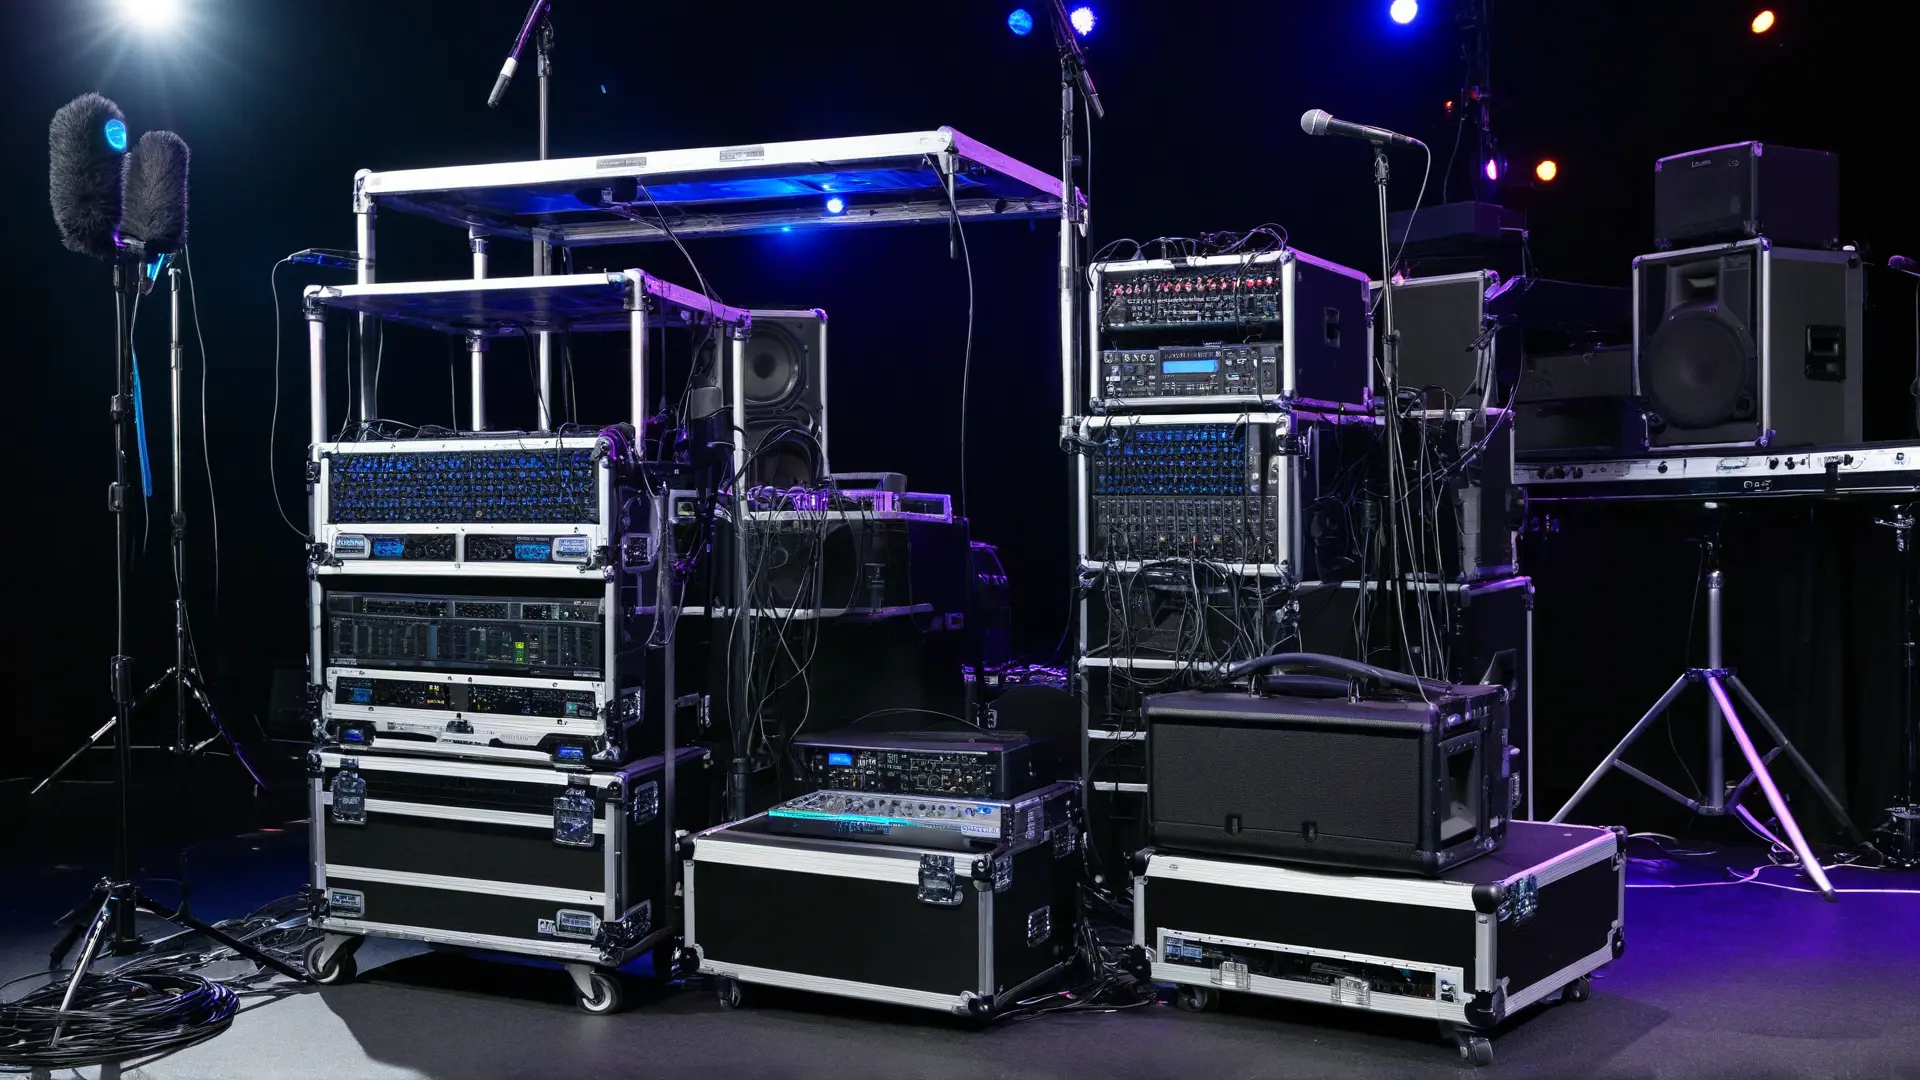
Table of Contents
- The One-Trip Philosophy
- Anatomy of a Live Sound Rack
- Power Distribution (Bottom of Rack)
- Wireless Systems
- Signal Processing
- Laptop Integration
- Guitar Integration
- Signal Flow: Why Order Matters
- Choosing Your Case
- Power Management in the Real World
- Power Budgeting (Typical Draws)
- When to Consider a UPS
- Venue Integration: Playing Nice with House Sound
- The Advance
- Typical Connections
- Building Your First Rack
- Entry Level (Mobile DJ / Coffee Shop Gigs)
- Professional (Touring / Large Venues)
- Lessons Learned (The Hard Way)
- Maintenance and Longevity
- The Bottom Line
- Resources
Building a Portable Live Sound Rack: A Practical Guide
If you’ve ever shown up to a gig with a tangle of cables, a pile of loose gear, and that sinking feeling that you’ve forgotten something critical — this guide is for you.
After years of dragging equipment through club back doors, up church stairs, and across festival stages, I’ve learned one thing: a well-organized rack isn’t just convenient — it’s survival. Your back will thank you. Your sound check will thank you. And when something goes wrong mid-show (it will), you’ll actually be able to troubleshoot instead of panic-sweating.
Let me walk you through how I built my portable live sound rig, what I’ve learned along the way, and how you can build your own.
The One-Trip Philosophy

The goal is simple: make one trip from your car to the stage.
Everything — power, audio processing, wireless systems, laptop integration — goes in or on your rolling rack case. When you arrive, you roll in, plug in three connections (power, main out, monitors), and you’re ready to sound check in under 10 minutes.
Pro tip: The “one trip” rule isn’t just about convenience. It’s about reliability. Every loose cable and unmounted piece of gear is something that can get left behind, damaged in transit, or forgotten in the chaos of load-out.
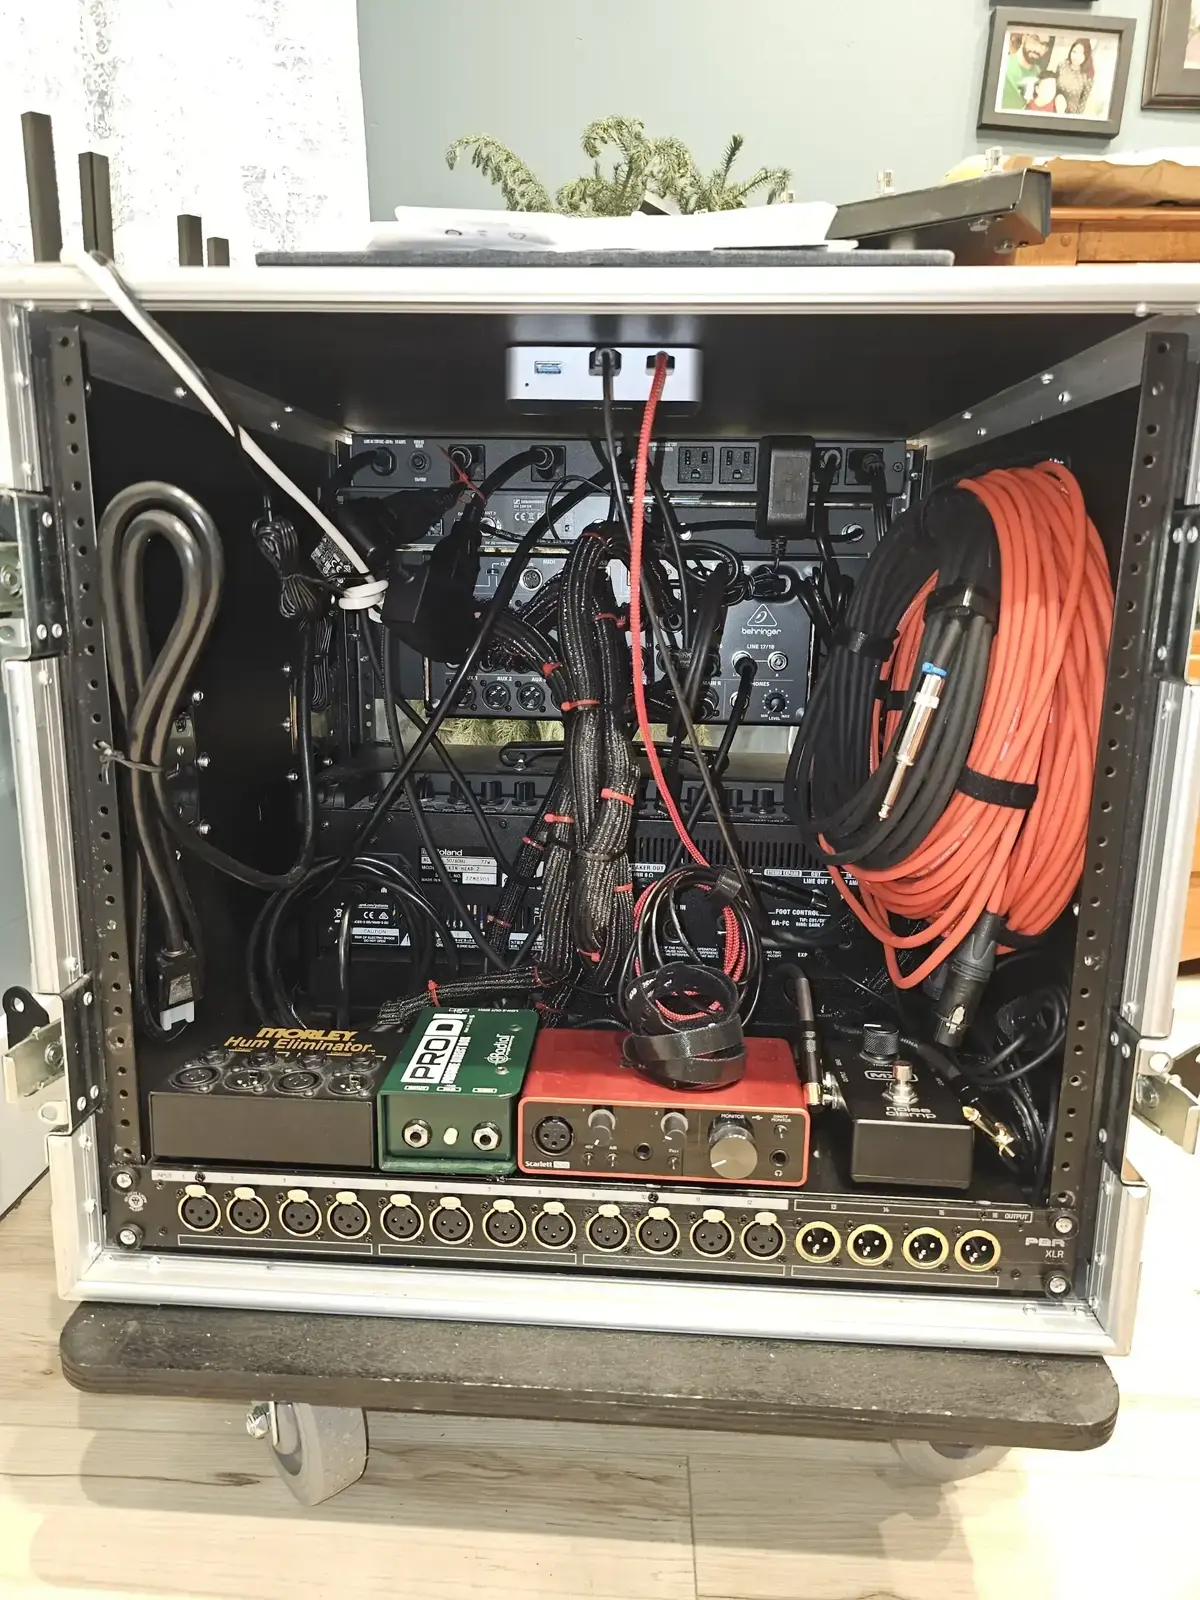
Anatomy of a Live Sound Rack
Let’s break down what actually goes inside, starting from the bottom and working up.
Power Distribution (Bottom of Rack)
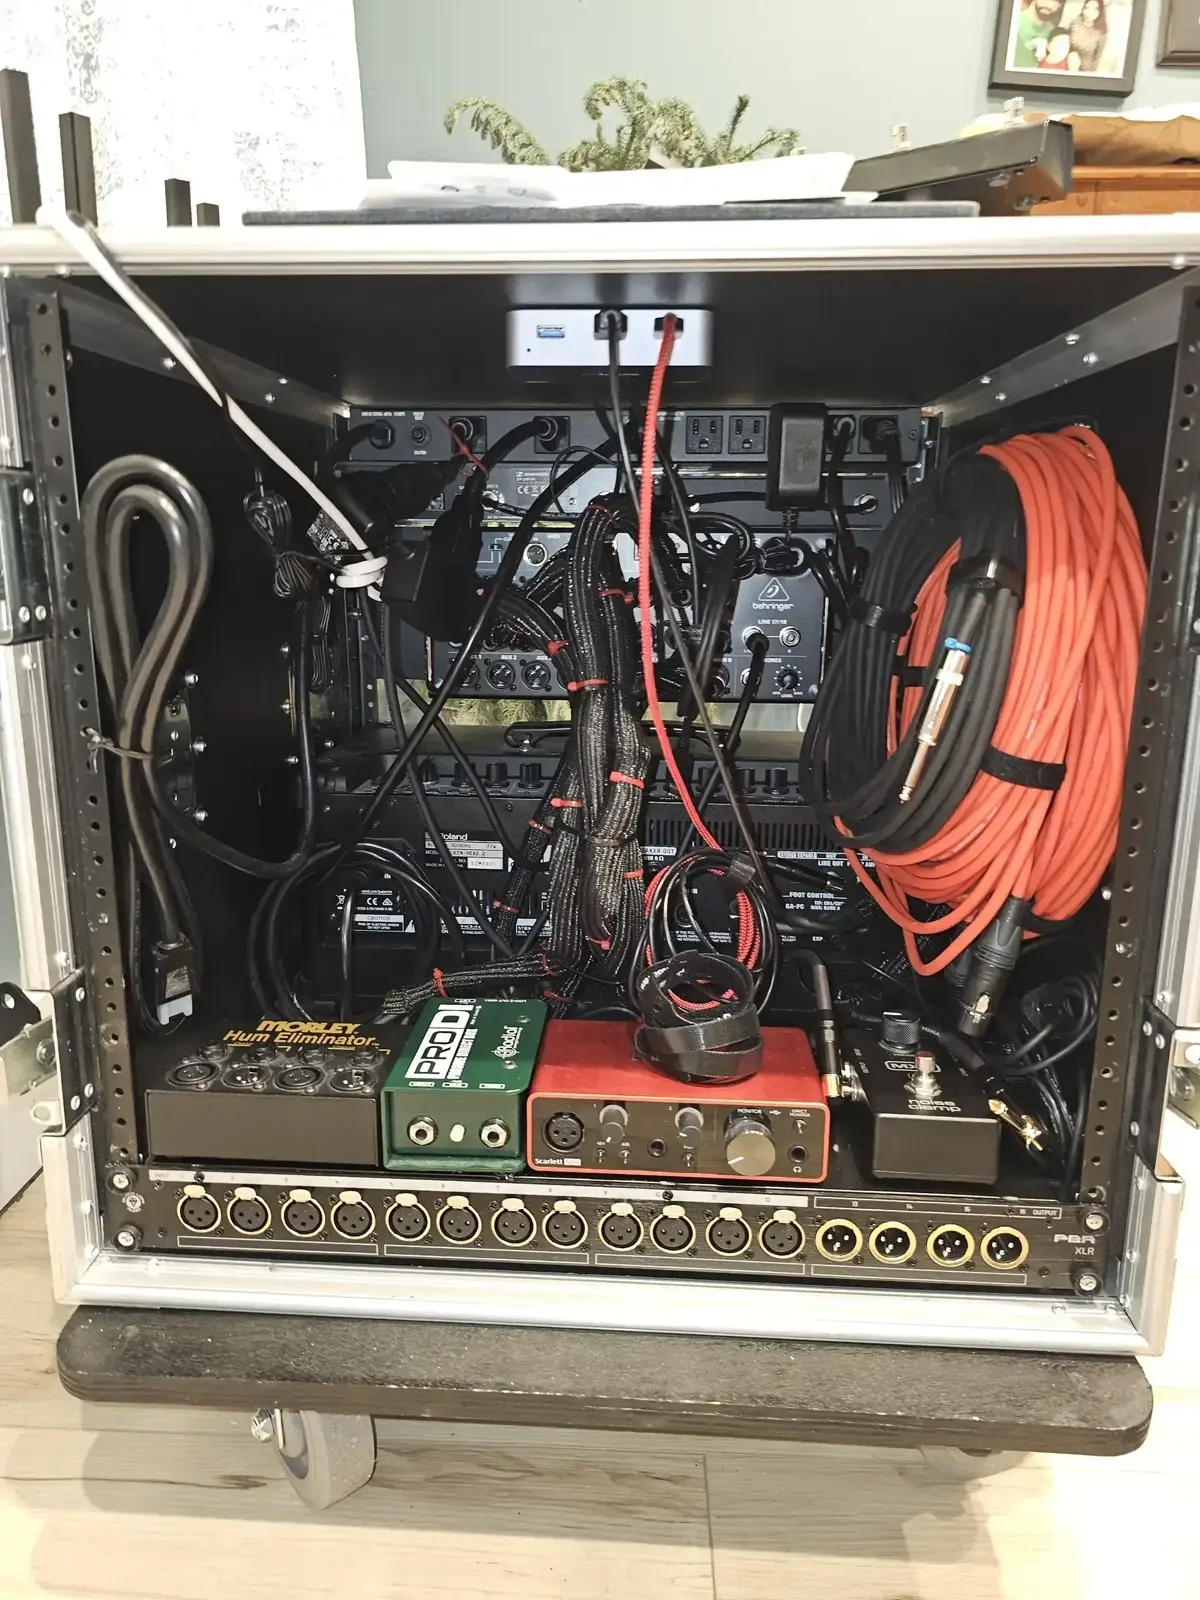
Always put power at the bottom. This isn’t just tradition — it’s physics. Power conditioners are heavy, they need to be grounded, and you don’t want power cables running over your audio gear.
A good power conditioner does three things:
- Surge protection — Saves your gear when the venue has “interesting” electrical infrastructure
- Voltage monitoring — Lets you see if you’re getting 115V or if the building’s 20 miles of extension cord has you at 98V
- Sequenced power-on — Prevents the dreaded pop through the speakers by turning things on in the right order
Power sequencing matters: Turn on sources first (wireless receivers, playback devices), then processing (mixers, effects), then amplifiers last. Reverse order for power-off. A sequencer does this automatically with one button.
I use a Furman power conditioner with voltage display. In venues with sketchy power, watching that meter has saved me from under-voltage situations that would have caused digital gear to behave unpredictably.
Wireless Systems
If you’re running wireless mics or instrument systems, rack-mounted receivers are the way to go. Shure’s BLX and SLX series, and Sennheiser’s EW line, all offer rack-mount kits.
A few lessons learned the hard way:
- Frequency coordination is not optional. Use the manufacturer’s app (Shure has a great one) to scan and coordinate frequencies before you arrive. Nothing kills credibility faster than your wireless cutting out during a show.
- Antenna placement matters. If you have front-mounted antennas, make sure they have line-of-sight to your transmitters. In large venues, remote antenna paddles are worth the investment.
- Battery paranoia is healthy. Always have fresh batteries. Check battery levels on the receiver display during sound check and before the show.
RF congestion is real. In urban venues, the 2.4GHz band is a war zone. If possible, use UHF wireless systems and coordinate frequencies. TV stations, Wi-Fi, and other wireless users will step on your signal.
Signal Processing
Depending on your setup, this could include:
- Graphic EQ — 31-band for room tuning
- Dynamics — Compressors, gates, limiters
- Effects — Reverb, delay (though many modern digital mixers handle this)
- Crossovers — If you’re running bi-amped or tri-amped systems
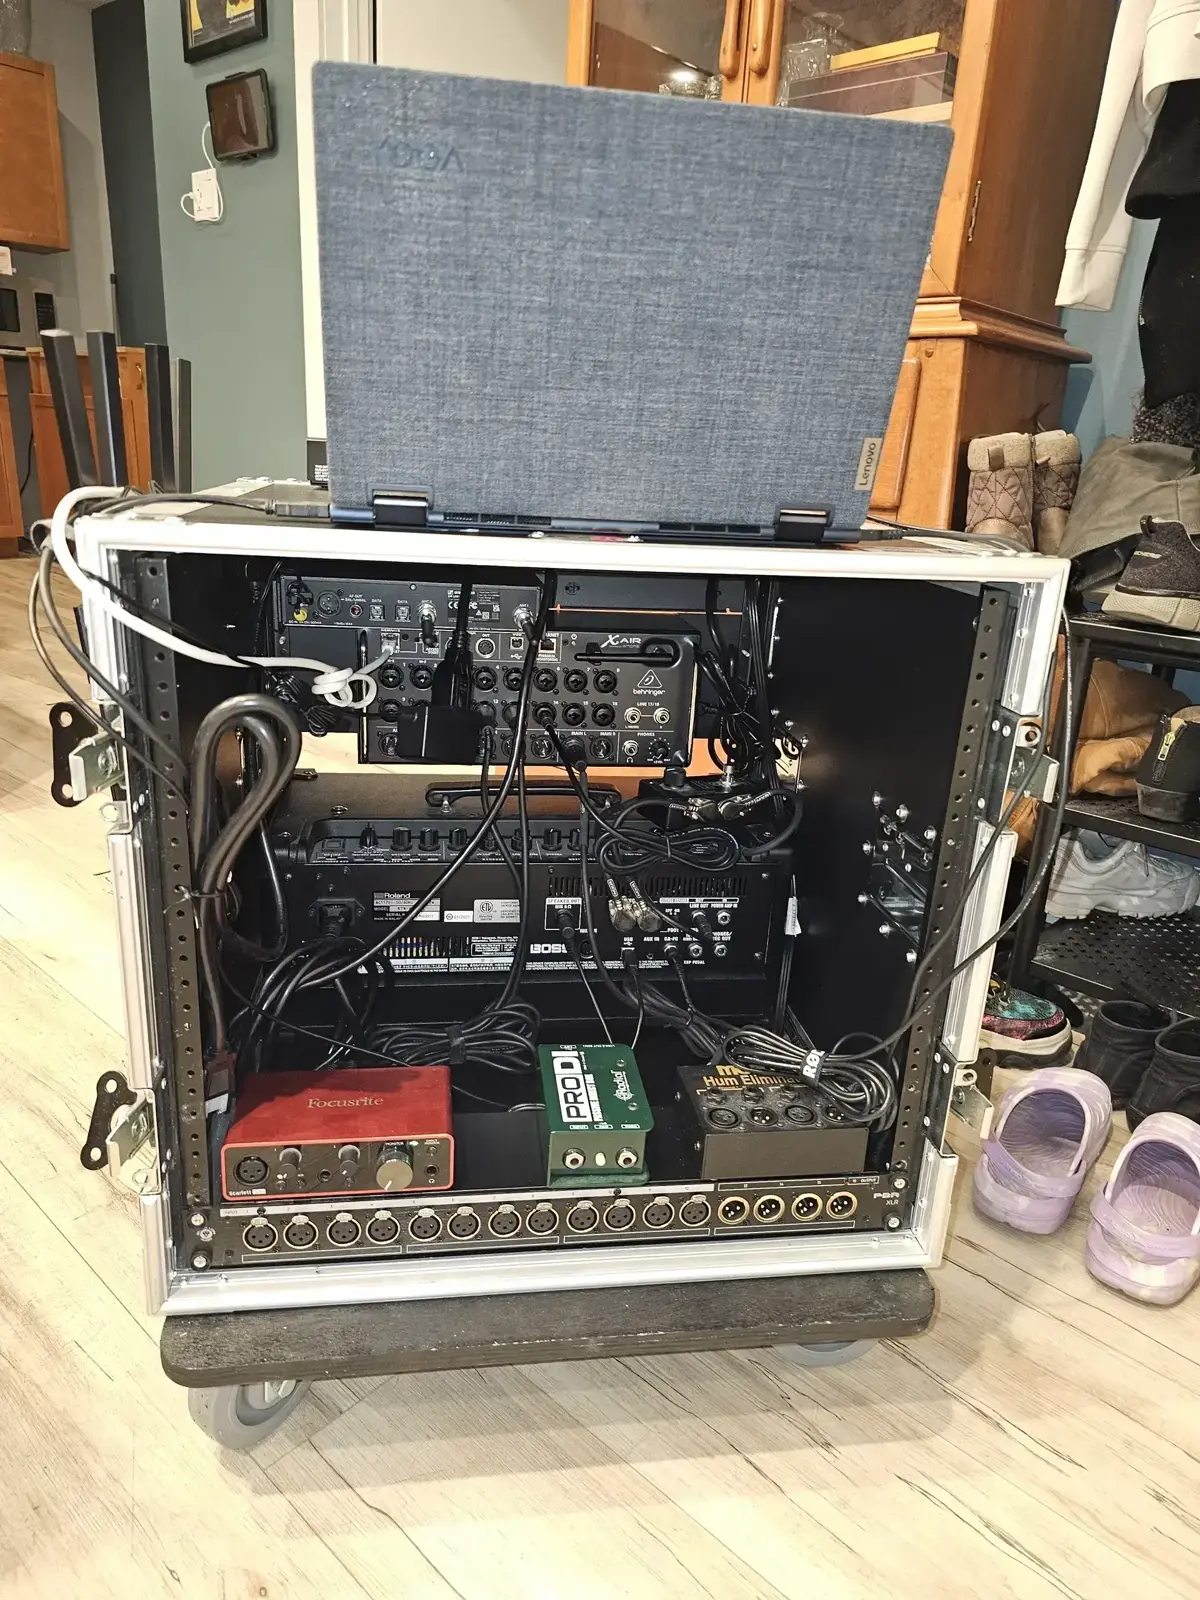
Here’s the thing: a lot of this is being absorbed into digital mixers. A Behringer XR18 or Allen & Heath Qu-SB gives you EQ, compression, gates, and effects in one rack unit. But there’s still room for outboard gear if you have specific needs or preferences.
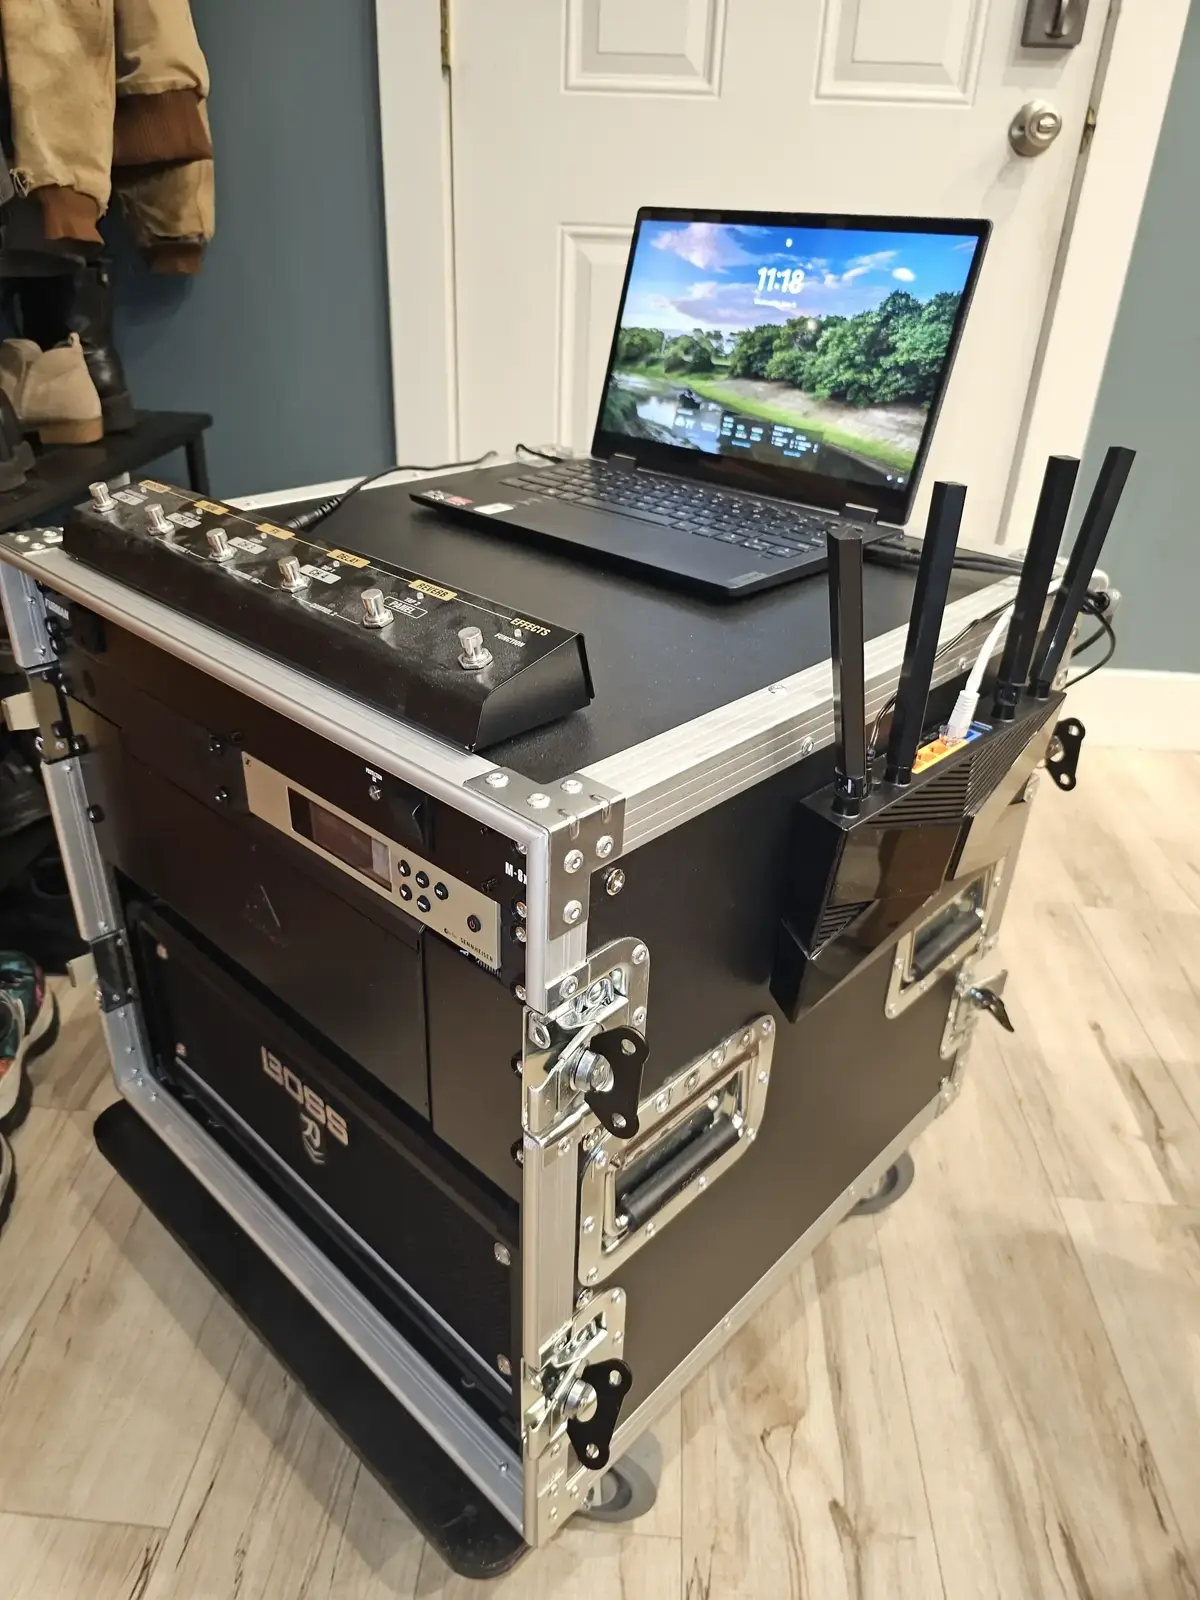
Laptop Integration
This is where things get interesting. Modern live sound often involves a laptop for:
- Virtual soundcheck — Playing back recorded tracks through your system
- Backing tracks / Click tracks — For synchronized performances
- Recording the show — Multi-track capture for later mixing
- Plugin processing — Using your DAW as an effects rack
The integration is straightforward: your audio interface (Focusrite, Universal Audio, PreSonus) connects to your laptop via USB or Thunderbolt, and your interface outputs feed your main mix or monitors.
Laptop reliability: Use a dedicated laptop for live sound, not your daily driver. Disable unnecessary services, connect only essential peripherals, and for the love of everything holy, turn off automatic updates.
I mount my laptop on a sliding tray in the rack lid — it’s protected during transport and at working height when set up. LED lighting inside the case isn’t just for looking cool (though it does look cool); it makes cable management visible on dark stages.
Guitar Integration
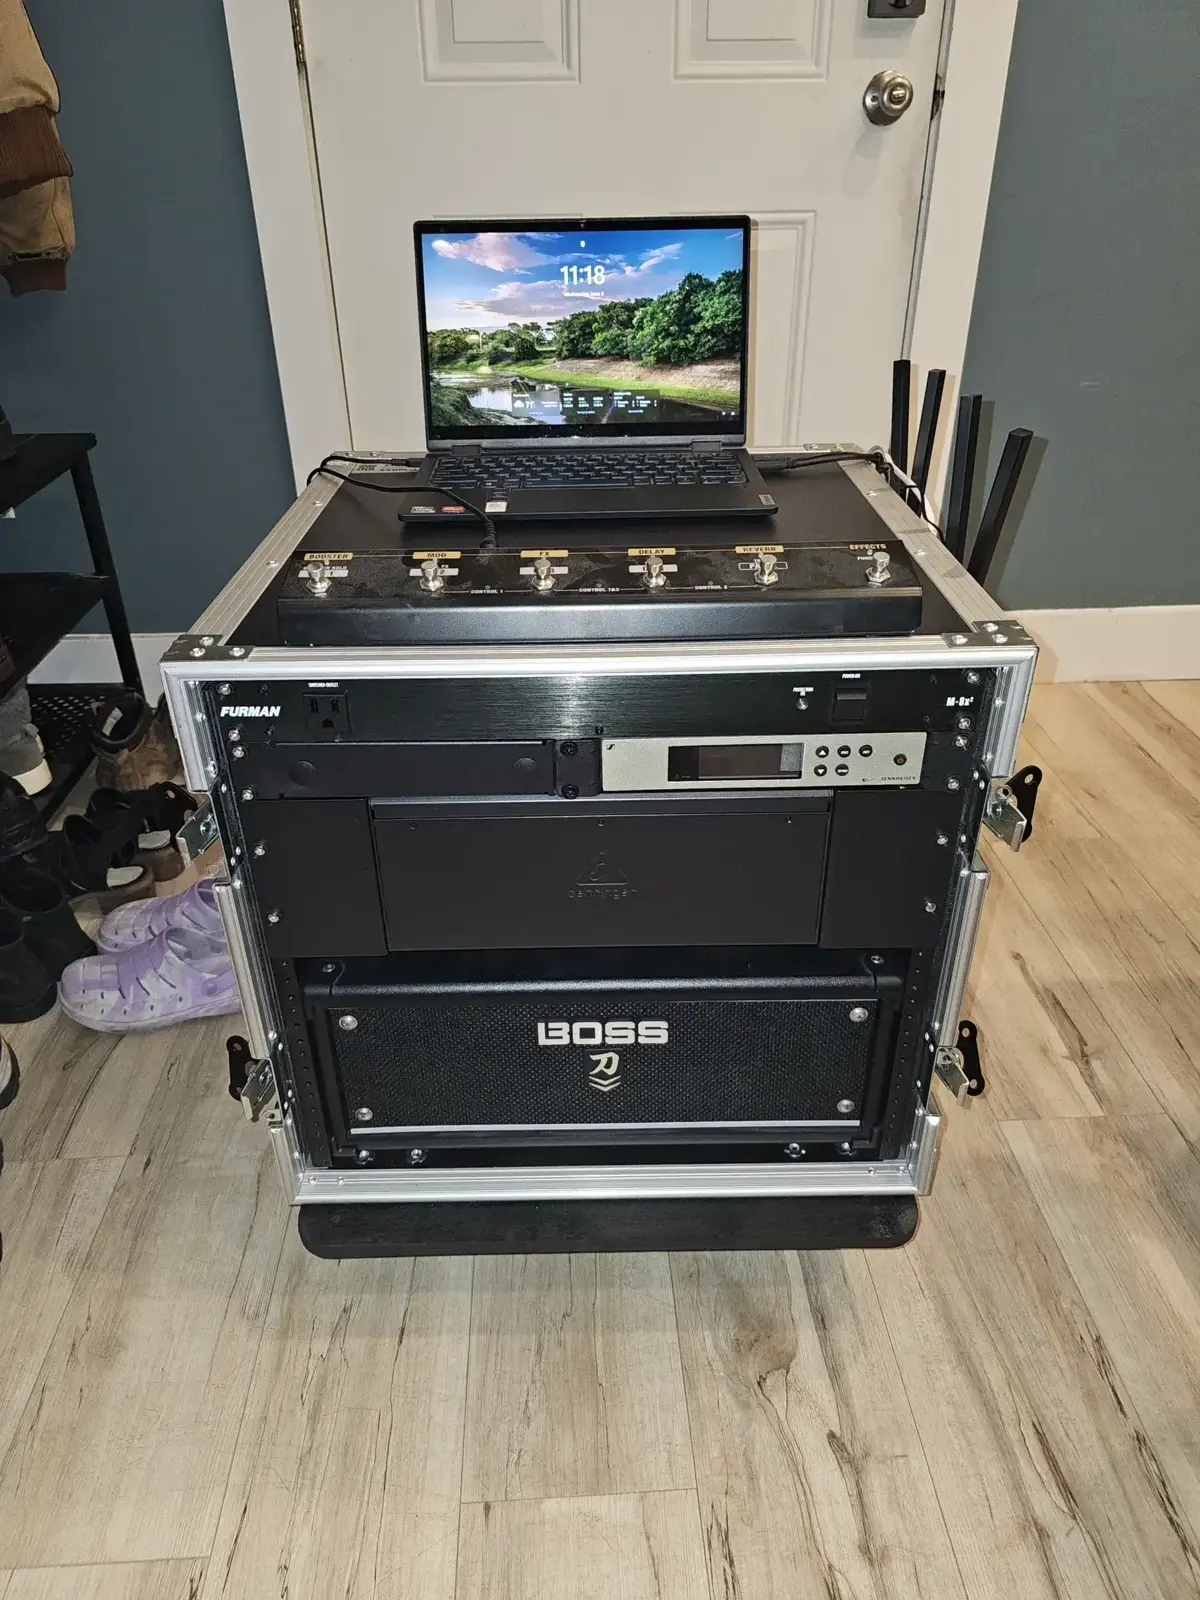
If you’re both running sound and playing guitar, you can integrate your guitar rig into the same rack:
- Amp modelers — Line 6 Helix, Fractal Axe-FX, Kemper
- Rack preamps — Marshall JMP-1, Mesa TriAxis
- Power amps — Tube or solid-state rack amps
- Guitar wireless — Shure GLX-D, Line 6 Relay
This is the “kitchen sink” approach — everything in one case. It works, but weight becomes a real factor. My combined audio/guitar rack is manageable, but I wouldn’t want it any heavier.
Signal Flow: Why Order Matters
Let’s make this visual:
WIRELESS RECEIVERS → MIXER CHANNELS → MAIN MIX → GRAPHIC EQ → POWER AMPS → SPEAKERS
                          ↓
                      MONITOR SENDS
                          ↓
IEM/WEDGESCommon mistake: Putting your graphic EQ before your main mix instead of after. The EQ should be tuning your output to the room, not affecting your recorded mixes or monitor sends.
Why this order:
- Wireless receivers are your sources — they feed the mixer
- Mixer does your gain staging, EQ, dynamics, and mix creation
- Graphic EQ is for room tuning — cutting problem frequencies, not boosting everything
- Power amps are last before speakers — they need to receive a clean, line-level signal
Every time you add something to your signal chain, you’re adding potential points of failure and noise. Keep it simple.
Choosing Your Case
Not all racks are created equal. Here’s the decision matrix:
| Case Type | Best For | Price Range |
|---|---|---|
| Soft Rack Bag | Light local gigs, coffee shops | $50-150 |
| Roto-Molded (SKB) | Regular gigging, durable protection | $150-400 |
| ATA Flight Case | Touring, air travel | $300-800 |
| Shock Mount | Heavy amps, rough roads | $400-1000+ |
| Rolling Road Case | Mobile DJs, solo engineers | $200-600 |
Sizing guide: 2-4U fits power + wireless. 6U adds processing. 8-10U is a full live rig. 6U is about the max for comfortable solo handling — anything heavier needs wheels and a sane weight distribution.
I’ve landed on rolling road cases with shock-mounted racks for my main system. The wheels aren’t a luxury — they’re a necessity when you’re navigating uneven pavement, stairs, and gravel parking lots.
Depth matters too. Full-depth cases accommodate power amps; shallow cases are fine for effects processors. Know your gear’s depth before ordering.
Power Management in the Real World
Venues are not created equal. Some have immaculate power with dedicated circuits; others have you plugged into the same circuit as the bar fridge and the LED wall.
Power Budgeting (Typical Draws)
| Device | Power Draw |
|---|---|
| Digital mixer | 50-150W |
| Wireless receivers | 10-30W each |
| Laptop + interface | 50-100W |
| Effects processors | 20-50W each |
| Power amp | 200-2000W (varies wildly) |
Ground loops are the enemy. If you’re getting that nasty 60Hz hum, try plugging everything into the same circuit. A single power inlet from your rack into house power eliminates ground loops within your system.
When to Consider a UPS
For laptop and digital mixer protection, a small UPS (uninterruptible power supply) can save your show. If venue power fluctuates or briefly drops, you’re still running. For a couple hundred dollars, it’s cheap insurance for digital gear.
Venue Integration: Playing Nice with House Sound
When you’re working with a venue’s house system, communication is everything.
The Advance
Before the show, send the venue:
- Input list — What inputs you’re providing (wireless mics, DI feeds, etc.)
- Stage plot — Where everything goes on stage
- Technical needs — Power requirements, monitor needs, special requests
Template everything. Have standard input lists and stage plots ready to send. It makes you look professional and saves everyone time.
Typical Connections
| What | Connection |
|---|---|
| Main outputs | XLR to house PA |
| Monitor sends | XLR to wedges or IEM transmitters |
| Recording out | USB/FireWire to laptop |
| Network | Ethernet for digital snake or remote control |
| Power | Single Edison or L6-20 connection |
The goal is to give the house engineer a clean, professional setup that integrates seamlessly with their system.
Building Your First Rack
Let’s talk budgets. Here are three tiers based on where you are in your journey:
Entry Level (Mobile DJ / Coffee Shop Gigs)
| Component | Budget Option | Mid-Range |
|---|---|---|
| Rack case | Gator GR-4L ($100) | SKB Roto 4U ($250) |
| Power conditioner | ART PS4x4 ($150) | Furman M-8X2 ($100) |
| Wireless mic | Shure BLX ($300) | Shure SLX ($600) |
| Mixer | Behringer XR12 ($300) | Allen & Heath Qu-SB ($700) |
| Total | ~$850 | ~$1,650 |
This gets you a functioning rig that’s reliable for small venues and mobile work.
Professional (Touring / Large Venues)
| Component | Price Range |
|---|---|
| Shock mount case (10U) | $400-800 |
| Power sequencer | $400-800 |
| Wireless (2 channels) | $1,500-4,000 |
| Digital mixer | $1,500-5,000 |
| Processing | $500-2,000 |
| Total | $4,300-12,600 |
The jump from entry-level to professional isn’t just about sound quality — it’s about reliability, RF performance, and workflow efficiency.
Lessons Learned (The Hard Way)
After years of gigs, here’s what I wish I’d known from the start:
-
Label every cable. Both ends. Every cable. You will thank yourself at 2 AM during emergency troubleshooting.
-
Bring spares. XLR cables, batteries, fuses, a backup wireless mic. The one time you don’t bring a spare is the time you’ll need it.
-
Test before you leave. Set up your entire rig at home, run signal through everything, and confirm it works before load-out. Sound check is for sounding, not for debugging.
-
Power first, signal second. When troubleshooting, always check power first. Is it plugged in? Is the breaker tripped? Is the venue power actually on?
-
Keep a laminated patch map in the lid. When someone asks “which channel is the vocal mic?” you shouldn’t have to guess.
The 80/20 rule of live sound: You use 20% of your gear’s features 80% of the time. Dial in those 20% perfectly before worrying about the rest.
Maintenance and Longevity
Your rack isn’t a “set it and forget it” proposition:
- Clean contacts periodically — Oxidation causes intermittent connections
- Update firmware — Keep digital gear current, but test updates before shows
- Battery management — Lithium batteries degrade; track their age and replace before they fail
- Cable inspection — Check for frayed cables and loose connectors during setup
The Bottom Line
A portable live sound rack is an investment in reliability, professionalism, and your own sanity. Start with what you need — not what sounds impressive on a spec sheet — and build from there.
The best rack is one that works every time, sets up fast, and lets you focus on what matters: the show itself.
Resources
Recommended Brands:
- Cases: SKB, Gator, Odyssey, Pelican (for fly dates)
- Power: Furman, ART, Monoprice Stage Right
- Wireless: Shure, Sennheiser, Line 6 (for guitar)
- Mixers: Behringer XR series, Allen & Heath Qu-SB, Midas
Learning More:
- r/livesound on Reddit — Great community for practical advice
- Gearspace forums — Deep technical discussions
- ProSoundWeb — Industry professionals sharing knowledge
Questions about building your own rig? Hit me up. I’m always happy to talk gear.


Comments
Powered by GitHub Discussions