Incus Container Manager in 2026: Modern LXD Alternative for Homelabs
Set up Incus as a modern LXD alternative for your homelab. Learn container and VM management, storage, networking, and GPU passthrough.
Table of Contents
- Why Incus Over LXD?
- Incus vs Docker: A Quick Distinction
- Installing Incus
- Ubuntu 24.04 LTS and Later
- Debian 12 (Bookworm)
- Initial Setup
- Managing Containers and VMs
- Resource Limits
- Storage Pools
- Networking
- Profiles: Reusable Configurations
- The Web UI
- GPU Passthrough for AI Workloads
- Containers (Shared GPU)
- VMs (Dedicated GPU)
- Security Best Practices
- Homelab Use Cases
- Pi-hole Network Ad Blocker
- Home Assistant
- Media Server (Plex/Jellyfin)
- Snapshots and Backups
- Quick Snapshots
- Full Backups
- Migrating from LXD
- Incus vs Proxmox: Which for Your Homelab?
- Conclusion
Incus Container Manager in 2026: Modern LXD Alternative for Homelabs
If you’ve been running LXD for your homelab and wondering about its future, you’re not alone. Canonical’s 2023 shakeup—with the AGPLv3 relicensing and Snap-first approach—left many homelabbers looking for alternatives. Enter Incus: a community-driven fork by the original LXD creators that keeps the spirit of system container management alive and thriving.
In this guide, I’ll walk you through setting up Incus, managing containers and VMs, and why it might be the right choice for your homelab in 2026.
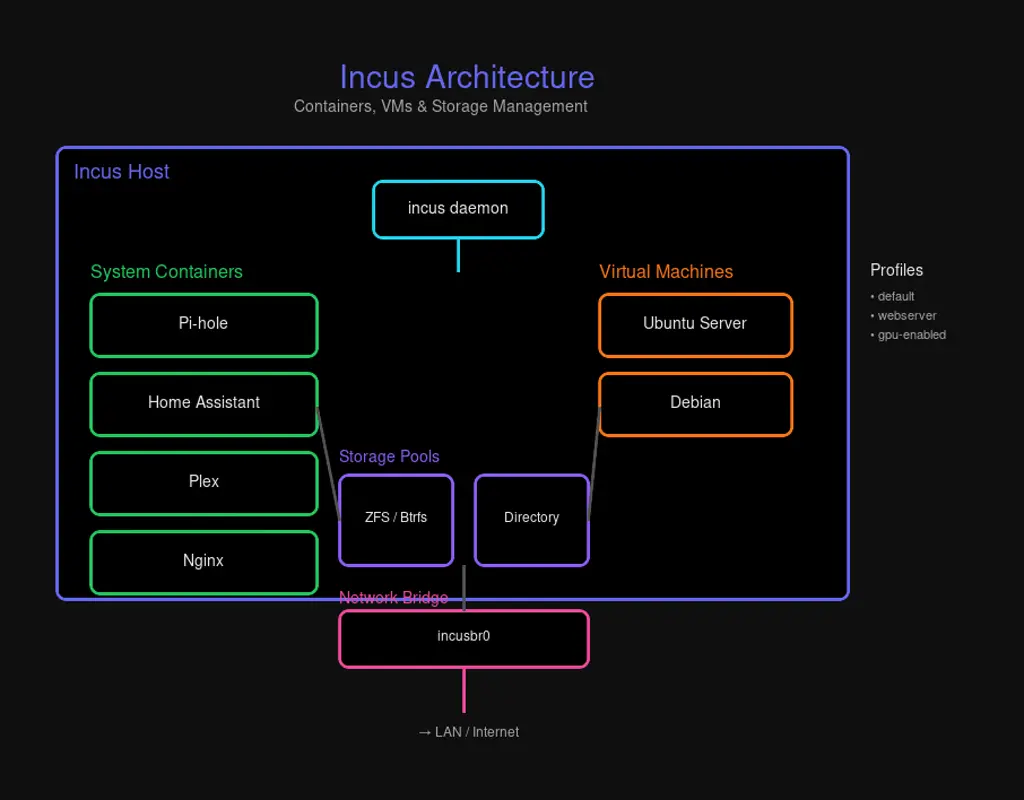
Why Incus Over LXD?
The fork wasn’t just about licensing drama. Incus represents a philosophical shift:
- Apache 2.0 License: Truly open source, no AGPLv3 restrictions
- Community Governance: Run by Linux Containers, not a single corporate entity
- Native Packages: No forced Snap installation—install via
apton Debian and Ubuntu - Linux Containers Image Server: Full access to community images (blocked for LXD since May 2024)
For homelabbers who value control and transparency, Incus offers the same powerful container and VM management without Canonical’s ecosystem lock-in.
Incus vs Docker: A Quick Distinction
| Feature | Incus | Docker |
|---|---|---|
| Container Type | System containers (full OS) | Application containers |
| VMs | Yes (with --vm flag) | No |
| Use Case | Homelab servers, persistent services | Microservices, development |
| Networking | Built-in bridge, routed, macvlan | Bridge only |
| Storage | ZFS, Btrfs, LVM, dir, Ceph | OverlayFS, volumes |
Think of Incus as your homelab’s virtualization layer—where Docker is the application layer inside.
Installing Incus
Ubuntu 24.04 LTS and Later
# Install Incus and required components
sudo apt update
sudo apt install incus qemu-system incus-tools

# Add your user to the admin group
sudo adduser $USER incus-admin
newgrp incus-admin
Debian 12 (Bookworm)
Add the Zabbly repository for the latest stable release:
sudo apt install wget
sudo mkdir -p /etc/apt/keyrings
sudo curl -fsSL https://pkgs.zabbly.com/key.asc -o /etc/apt/keyrings/zabbly.asc

echo "Enabled: yes
Types: deb
URIs: https://pkgs.zabbly.com/incus/stable
Suites: $(. /etc/os-release && echo ${VERSION_CODENAME})
Components: main
Architectures: $(dpkg --print-architecture)
Signed-By: /etc/apt/keyrings/zabbly.asc" | sudo tee /etc/apt/sources.list.d/zabbly-incus-stable.sources

sudo apt update
sudo apt install incus
Initial Setup
Run the interactive initialization:
incus admin initFor a quick non-interactive setup:
incus admin init --minimalYou’ll configure:
- Storage pool (Btrfs recommended for snapshots)
- Network bridge (
incusbr0by default) - Image server access
Managing Containers and VMs
Incus is image-based. Pull from the community server:
# List available images
incus image list images:

# Launch a Debian 12 container
incus launch images:debian/12 mycontainer

# Launch a VM instead
incus launch images:debian/12 myvm --vm

# List all instances
incus list

# Get a shell inside
incus exec mycontainer -- bash

# Check instance details
incus info mycontainer
Resource Limits
# Set memory limit to 2GB
incus config set mycontainer limits.memory=2GiB

# Limit to 2 CPU cores
incus config set mycontainer limits.cpu=2

# Override VM disk size
incus config device override myvm root size=50GiB
Storage Pools
Incus supports multiple storage backends:
| Driver | Best For | Features |
|---|---|---|
| Btrfs | Most homelabs | Snapshots, compression, easy |
| ZFS | Advanced users | Deduplication, RAID-Z, integrity |
| dir | Testing only | Simple, no snapshots |
| LVM | Legacy systems | Logical volumes |
| Ceph | Distributed storage | Clustering |
# List storage pools
incus storage list

# Create a Btrfs pool on a dedicated disk
incus storage create mypool btrfs source=/dev/sdb

# Show pool details
incus storage show default
Networking
The default bridge (incusbr0) handles DHCP and NAT for your instances. For more control:
# List networks
incus network list

# Create a bridged network on your LAN
incus network create my-bridge nic type=bridged parent=eth0

# Configure IP range
incus network set incusbr0 ipv4.address=10.10.0.1/24
For homelab use, macvlan lets containers appear directly on your network:
incus network create macvlan-net nic type=macvlan parent=eth0Profiles: Reusable Configurations
Profiles define common settings that apply to multiple instances:
# Create a web server profile
incus profile create webserver

# Set CPU and memory limits
incus profile set webserver limits.cpu=2 limits.memory=2GiB

# Attach a network
incus profile device add webserver eth0 nic network=incusbr0

# Launch with the profile
incus launch images:ubuntu/22.04 mysite --profile default --profile webserver
The Web UI
While Incus focuses on CLI management, you can add a web interface:
# Enable HTTPS listener
sudo incus config set core.https_address :8443

# Install the canonical UI (community-maintained port of LXD UI)
sudo apt install incus-ui-canonical
Access at https://<your-server>:8443. You’ll need to import a client certificate for authentication.
For managing multiple Incus servers, consider LXConsole—a Docker-based web UI that connects to Incus APIs remotely.
GPU Passthrough for AI Workloads
Running AI models? Incus can pass GPUs to containers or VMs:
Containers (Shared GPU)
# Enable NVIDIA runtime
incus config set mycontainer nvidia.runtime=true

# Add the GPU device
incus config device add mycontainer gpu0 gpu
VMs (Dedicated GPU)
# Full passthrough for VMs
incus config device add myvm gpu0 gpu gputype=physical
Requirements:
- NVIDIA drivers installed on host
- IOMMU enabled in BIOS for VM passthrough
- VFIO kernel modules loaded
Security Best Practices
Incus defaults to unprivileged containers—root inside maps to an unprivileged user on the host. This is your first line of defense.
Additional hardening:
# Isolated ID mapping for nested containers (Docker-in-Incus)
incus config set mycontainer security.idmap.isolated=true

# Enable nesting if running Docker inside
incus config set mycontainer security.nesting=true
Key practices:
- Limit access: Only trusted users in
incus-admingroup - Keep updated: Use LTS releases for production
- Resource limits: Prevent runaway containers from starving your host
- Network isolation: Use firewall rules to restrict port 8443
Homelab Use Cases
Pi-hole Network Ad Blocker
incus launch images:debian/12 pihole
incus exec pihole -- bash -c "curl -sSL https://install.pi-hole.net | bash"
# Configure your router to use Pi-hole DNS
Home Assistant
# VM recommended for isolation
incus launch images:debian/12 homeassistant --vm
incus config device override homeassistant root size=50GiB
# Install Home Assistant inside the VM
Media Server (Plex/Jellyfin)
incus launch images:ubuntu/22.04 plex
incus config device add plex media disk path=/media source=/mnt/media
# Install Plex or Jellyfin inside
Snapshots and Backups
Quick Snapshots
# Create snapshot
incus snapshot create mycontainer snap1

# Restore if needed
incus snapshot restore mycontainer snap1

# Delete snapshot
incus snapshot delete mycontainer snap1
Full Backups
# Export instance
incus export mycontainer backup.tar.gz

# Restore from backup
incus import backup.tar.gz mycontainer-restored
Migrating from LXD
If you’re coming from LXD, the migration is straightforward:
# Install Incus (don't init)
sudo apt install incus

# Install migration tool
sudo apt install incus-tools

# Run migration (destroys LXD config)
lxd-to-incus
The tool handles everything—storage, networks, profiles, and instances transfer intact.
Incus vs Proxmox: Which for Your Homelab?
| Aspect | Incus | Proxmox |
|---|---|---|
| Overhead | Lower (containers-first) | Higher (VM-first) |
| UI | Optional CLI-centric | Full web GUI |
| Clustering | Limited | Built-in |
| ZFS Integration | Manual | Native |
| Learning Curve | Moderate | Steeper |
| Best For | Multi-container workloads | Mixed VM/container farms |
Run Incus standalone for a lean container host. Use Proxmox if you need a full hypervisor with clustering and GUI management.
Conclusion
Incus gives you the best of both worlds: container efficiency with VM isolation when you need it, all under a community-driven governance model. For homelabbers seeking a modern LXD alternative without Canonical’s baggage, Incus is ready for production.
Start with a simple container, add some profiles, and scale up as needed. Your homelab just got an upgrade.
Have questions? The Linux Containers community forums are active and helpful. Happy containerizing!


Comments
Powered by GitHub Discussions